
You would think that professional bird and wildlife photographers all use the same settings on camera,
Well, then I have to disappoint you.
Now take ISO for example, some pro’s don’t go over ISO 800,
others go smoothly to ISO 6400 or something in between.
Of course it all depends on the conditions you are shooting in. If you shoot in dark woods or shooting at sunrise, or in full sunlight on an open meadow,
hence settings can be different for every photographer.
For flying birds you may want to set the IBIS differently or just turn it off.
But on dial there are just three adjustable Custom Settings. So, small adjustments may always be necessary.
For the rest, whether you pay for a list of settings and .SET file from a Pro, the FREE list of OSP and the accompanying settings file .SET is no different.
For ISO I chose to go up to maximum ISO 3200,
at that point the noise level is already a bit too high as far as I’m concerned,
but on the other hand it will give you the opportunity to take a picture in difficult conditions. In Custom Menu -> E1 -> ISO Auto Set -> set to 3200 – 200 -> set lowest shutter setting to auto
Choices must therefore be made,
and one of the choices is the recording mode M, S, A or P.
because the next step is to set up our settings before locking them in a custom mode.
For this tutorial, as well as the ones I use myself, set the M mode for Manual.
How to save these can be found right below this, in How Set Custom Modes
Memorize these before you start the final steps:
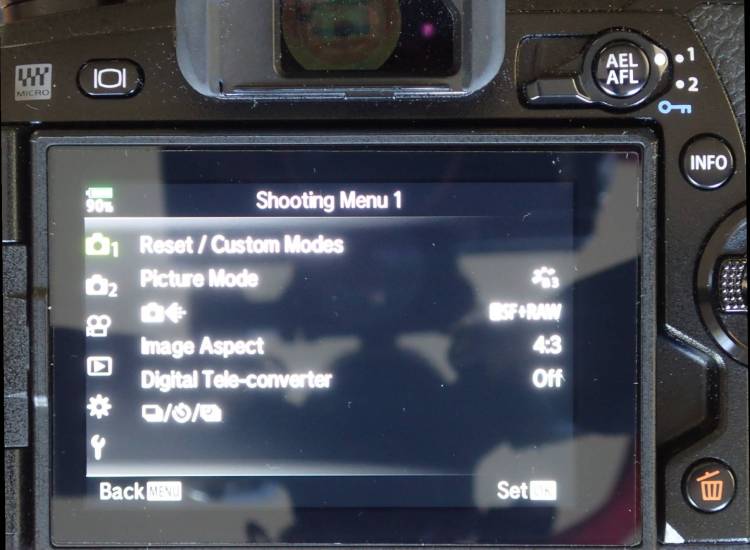
How Set Custom Modes :
Go To Shooting Menu 1 -> Reset/Custom Modes -> Assign To Custom Mode -> Choose C1/C2 or C3 -> on SET click OK
Additional Settings for Bird and Wildlife :
First Set Program Mode Dial to M – Manual
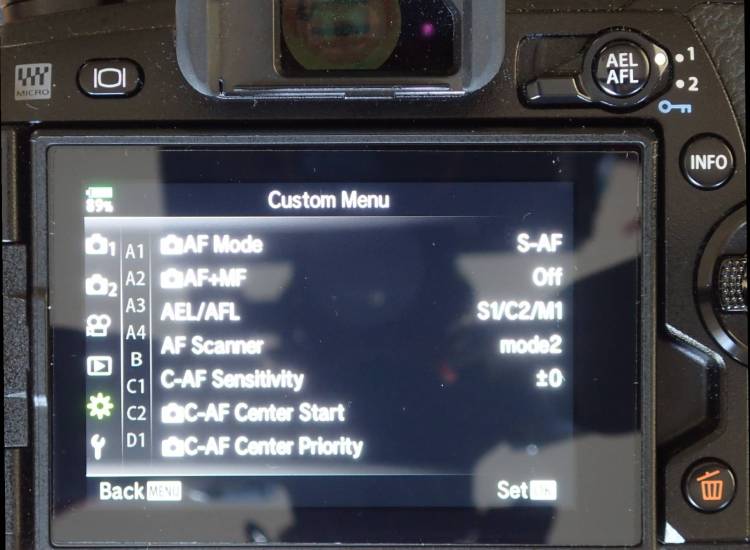
In Custom Menu :
A1 -> AF Mode -> S-AF
A1 -> AEL/AFL -> S-AF -> mode 3
A1 -> AEL/AFL -> C-AF -> mode 4
A1 -> AEL/AFL -> M -> mode 3
A1 -> AF Scanner -> mode 3
A1 -> C-AF Center Start -> only set cross (+)
A1 -> C-AF Center Priority -> only set cross (+)
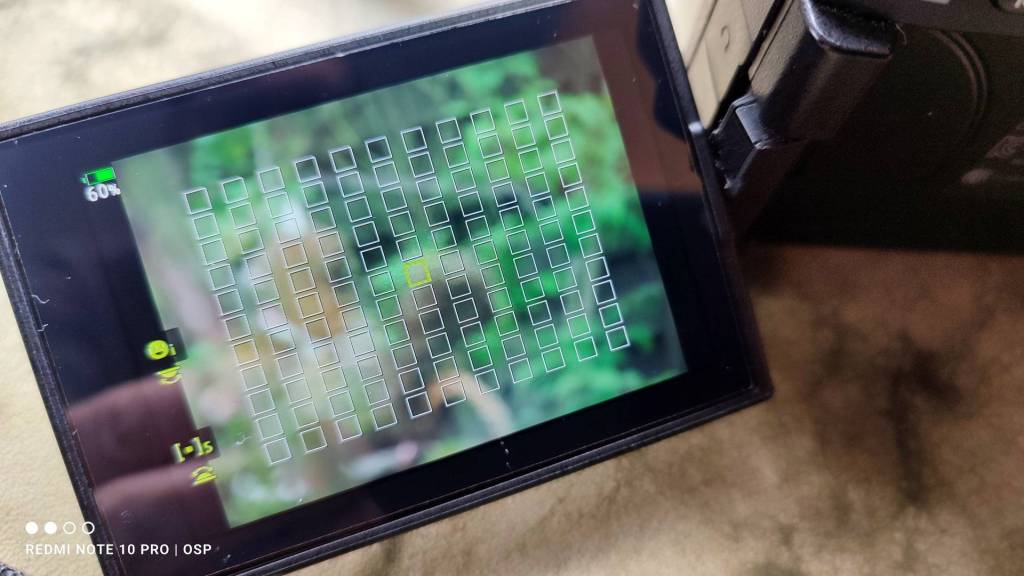
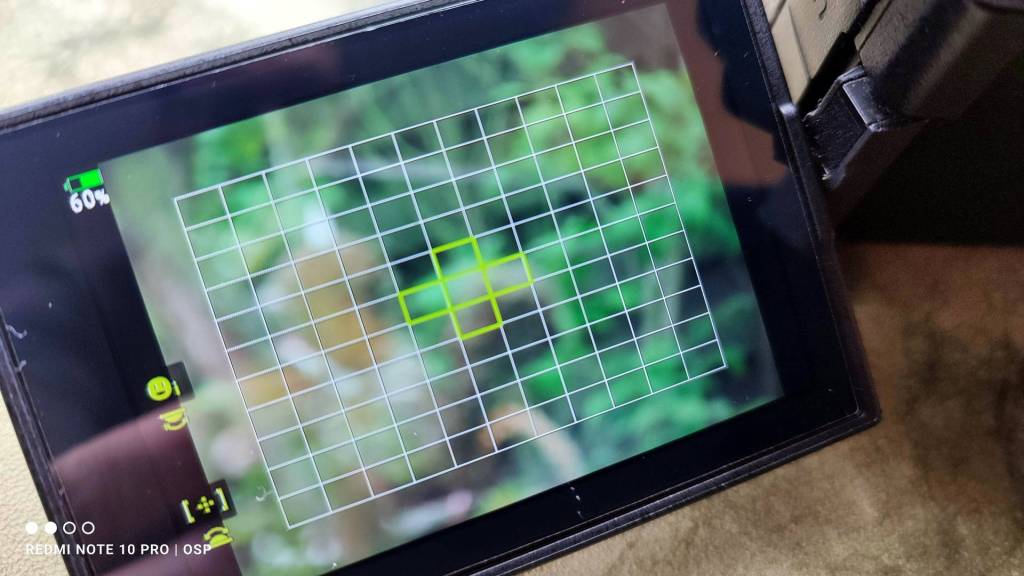
A2 -> Mode Settings -> set single point, cross (+) and 5×5
A2 -> AF Area Pointer -> set On2
B -> Button Function -> Fn1 set to WB/ISO (multi functional in part 1)
B -> Button Function -> Fn2 set to exposure correction (multi functional in part 1)
B -> Button Function -> Body Grip top button -> Magnify
B -> Button Function -> Body Grip bottom button -> Focus Peaking
C1 -> S-AF Release Priority -> set off
C1 -> C-AF Release Priority -> set off
C1 -> Continuous L -> Diamond Shutter -> set to 9fps
C1 -> Continuous L -> Electronic Shutter -> set to 9fps
C1 -> Continuous L -> Pro Cap -> 18fps -> Pre = 5 -> Limit=10
D4 -> Set Beep to off
I -> EVF Auto Switch -> Set to off
J2 -> Sleep -> Set 5min.
J2 -> Auto Power Off -> 30min.
Final Settings :
Set the basic shutter speed and aperture that your Custom Mode will use by default, like :
Shutter Diamond Single
Shutter 1/250
Aperture f6.3
Your auto ISO will now adjust to this.
Set Focus Mode in SCP to Single Point small
Set all the above settings to C1
Launch SCP (Super Control Panel)
Set Focus Mode to Cross (+)
Set Focus to C-AF
Set Face Priority to off
Set Shutter to Continuous to Electronic L (9fps)
Set Shutter to 1/1000
Set Aperture to f8
Set all the above settings to C2
Launch SCP (Super Control Panel)
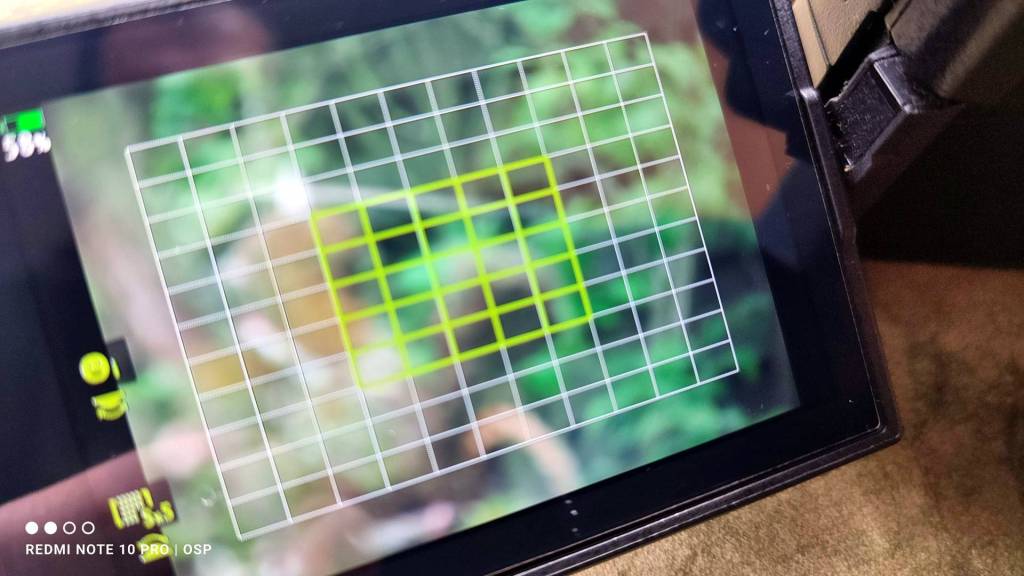
Same as above. Only change : Set Focus Mode to 5×5
Set all the above settings to C3
Additionally you could also activate the L-Fn button on the 300mm f4 Pro lens and 40-150mm f2.8 Pro lens as Back Button Focus – via B -> Button Function -> L-Fn -> Set AEL/AFL – OK
It is included in the downloadable .SET file.
Description settings C1, C2 and C3 :
C1 – General settings for various photography, but also static birds or game.
S-AF small, diamond shutter single.
C2 – C-AF, Cross (+) autofocus, small birds, sports and game
C3 – C-AF, 5×5 autofocus, big birds and game, possibly in motion or flight – IBIS adjusted to off or vertical only
Download FREE Settings File – .SET :
For those who want a quick adjustment of their camera, there is the FREE OSP – OM Workspace .SET file
You can also think of it as the basis of your settings, or the starting point to make further adjustments to suit your type of photography. This settings file is created for the E-M1 MKII with firmware 3.5. Please update your camera to an equal or higher firmware version before saving these settings.
Download .SET file : Olympus E-M1_MKII_v3.5
How to use the .SET file :
Download the zip file with the .SET file on your computer
Extract the zip file
Connect the camera to your computer with the official Olympus USB cable.
Turn on the camera and click on “Storage” to connect
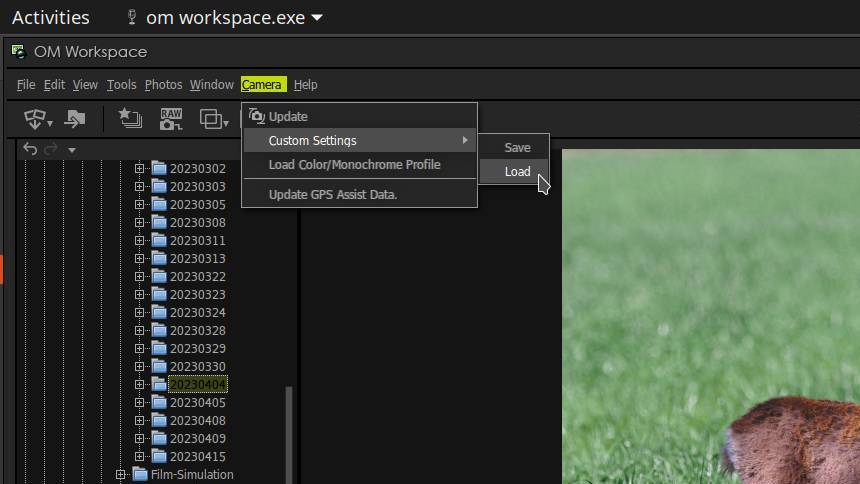
Go to OM Workspace
click Camera -> Custom Settings -> Load -> navigate to the .SET file
Load to camera and click ok
Updates may be added at a later date,
But for the most part these are the basic settings for bird and wildlife photography,
however, these are just as useful for sports and the like.
The custom settings on a camera are limited, there are only three in this case, but either way you would need a lot of presets to accommodate all circumstances.
So anyway you will have to make small adjustments along the way.
To stay motivated for this I don’t need money, but I do need your support, so…
Please Like, Follow and/or Comment below,
and I will come back to this as soon as possible.
The photo gallery of Open Source Photography, Olympus micro 4/3 system, Vintage Lens Photograpy, Film Simulation, PictureFX, HDR – Photographer : Marc R.
Discover more from Open Source Photography
Subscribe to get the latest posts sent to your email.


Hello, I downloaded the zip and inside there are two .set files, what is the difference between them?
Another thing, do you have other settings for high definition and action?
Greetings and thank you very much.
LikeLiked by 1 person
Hello Manuel,
Olympus & OM System gives little information about creating the .SET file, most of it I found on Petr Bambousek’s site.
As far as I know the export option gave the choice between general and custom settings. I myself have only done the test with both files, so I don’t know exactly if and what the difference is.
Research has also shown that there is no way to open the .set files for review or modification, so there is no way to know what and where things are.
The settings used are for Bird and Wildlife. I plan to provide settings for the E-M1 MKIII and E-M1X in the future, but also for Bird and Wildlife. It will not be my intention to make setting files for other photography branches as that is not my thing.
As I also wrote in the article, take into account the installed firmware and work with full batteries.
You will also understand that I cannot give any guarantee on any things that go wrong.
These are also basic settings, so they can also be adapted to your working method.
Thanks for reading my article !
Regards, Marc.
LikeLike
Muchas gracias por tu atención, esos archivos me ayudan muchisimo, y lo mas importante una vez instalados juego con ellos para sacarles el mayor redimiento.
Muchas gracias.
Thank you very much for your attention, these files help me a lot, and most importantly, once they are installed, I play with them to get the most out of them.
Thank you so much.
LikeLiked by 1 person
You’re welcome !
LikeLike
Hi Marc, great post, I thought I would share my current action settings with you on the OM1. These may be subject to change and we’re all different, but for now, this is working well for me and most is still relevant for the camera’s you have. Maybe you will get something from it.
Since picking up an SLR back in the ’80s, I have ALWAYS shot manual – I figured I would learn more. There is one exception, my C1 set up for birding, animals and action. Only in the last year of so I have switched to use Shutter priority so I can react faster and have less chance of having the wrong exposure where speed is often required. The only thing I need to watch out for is in dim light – early morning, late afternoon shadows or deep in the forest, where I need to lower the shutter speed from 2000 so that the image won’t be under exposed – the EV info will flash if this is the case.
After researching and experimenting a fair bit, here are the settings I use on the OM1:
Shutter priority – speed 1/2000, ProCapture SH2, C-AF+MF, all focus points, Image Stabilization S-IS1
Exposure Metering mode: ESP – set to under expose -1 as the birds are usually darker on a light background.
Auto ISO up to 12800 – Ideally ISO 5000 or less, f5.6, 1/3200,
I have bird/subject detection (set to a button so I can change subjects – I use EV button) and face/eye detect on another (so I can switch easily for people – I use AEL/AFL).
I edit using DxO Photolab 6. I have found that using Deep Prime XD noise reduction, with Luminance set at 60, Lens sharpness Global 1.60, Details and bokeh @ 60 is a pretty good base point for reducing the high ISO noise without losing detail. I also make other adjustments, but DxO Smart Lighting and Clear View Plus can also help refine detail. I then import into Photoshop CS6 (not CC), and apply spot sharpening if needed (eg, eyes).
LikeLike
Dear Tone,
Super great that you want to share this with us, I really appreciate this !
If I were you I would write a “best settings” article around this, and specifically for the OM-1 itself, there are few good photographers who want to do this, if not to say none,
because those that do are usually employed or sponsored by OM System/Olympus.
These kind of real life and tested experiences as you write down here are extremely valuable for many novice and also experienced nature photographers.
Many thanks Tone !
LikeLiked by 1 person
Thanks Marc, I actually had most of the info above already written into a note for a future blog post in mind – only last week I accidentally RESET instead of SET my C1 settings while trying to update them, so had to re-do them all and wrote it down. I was trying out the C-AF+TR[MF] focus mode, which seems more obvious for tracking, but for some reason I found C-AF[MF] works better. I did also read many people suggest single spot focus, but I found the OM1 to be “usually” good enough to find birds and follow them using all the focusing points. Being winter in Tasmania, I think the duller light is often not helping with tracking, which is why I have been experimenting.
LikeLiked by 1 person
OM System/Olympus has unnecessarily made saving settings too complicated, mistakes are easily made, and I don’t find saving via OM Workspace very user-friendly either.
Could be much easier by being able to save them on the SD card, for example, and in a kind of spreadsheet format that you can edit on a PC or Mac.
LikeLike
Hello, inside the zip to download there are two “.set files”, what is the difference between these two files?
greetings.
LikeLike
Hello Manuel,
I think you missed my previous answer to your question above.
The camera itself created 2 files from one set of settings.
Presumably they contain basic and specific settings, unfortunately there is no information about why the Mark II creates two files, both at Olympus, in the manual and also not on the internet.
Best is to upload one of the two, and check.
LikeLike
Hola, en este hilo se esplica mas o menos el tema del porqué hay dos archivos: https://e-m-wonderful.com/e-m1mark2-myset-2/
LikeLiked by 1 person
Hello Manuel,
Thank you for sharing your research on this.
For security reasons, I have modified your link to open on Google, and not on the external site mentioned.
That choice should remain with the possible reader of this comment.
Problems with external links like this Japanese link, is that you never know what will happen to it in the future.
That being said, I did follow your link, and indeed, so far as it is clear there are two files for the following reason : the first contains all the settings of the three custom settings (C1,C2,C3) that are applied at once – in the second you can use the three custom settings, C1, C2 and C3 separately.
A logical explanation, and interesting to know.
Thank you!
Marc
LikeLike
Ok, now I have it clear, I’m sorry about the Japanese link, good to take photos, what happens is that here in Puerto Santa Maria, (Spain). the sun is burning.
greetings
LikeLiked by 1 person