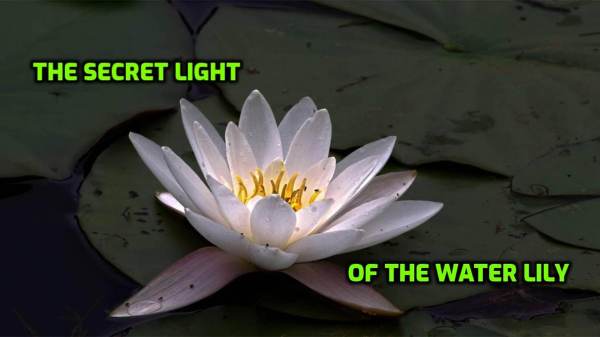
Creating a Natural-Looking HDR Image with RawTherapee and Luminance HDR When it comes to creating an HDR image that still feels natural, rather than screaming "overcooked", a careful workflow and thoughtful tone mapping choices are crucial.Let me walk you through how I recently processed a water lily to maintain realism while bringing out depth and... Continue Reading →
From RAW Roots to Forest Flower
Every image has a story, and this one starts as a humble RAW file—just data, just potential. But like the forest floor quietly waking up in spring, it only needed the right touch to bloom. With a careful edit in RawTherapee, some luminance tone mapping (Reinhard 02), and a bit of patience, this wood anemone... Continue Reading →
Deep Dive into Editing with RawTherapee – Part 4: Setting up a Workflow with Favorites and Color Management
Read this six-minute tweak for RawTherapee, and get a total workflow upgrade. A Fresh Start with RawTherapee: Setting Up Your Favorites for a Smarter Workflow, and Color Management with Adobe Camera Profiles. In a previous article, we talked about ART and other RawTherapee forks. One thing ART definitely has going for it is a simpler... Continue Reading →
The Budget Kingfisher’s Big Reveal
Well no, it’s not some magical recovery job – this is just a plain RAW file, shown in Neutral. But yeah... it is very dark. So the question becomes: can you still make something out of it in RawTherapee? Absolutely! RawTherapee’s bag of tricks can handle way worse than this. And honestly, with just a... Continue Reading →
Deep Dive in to Editing with RawTherapee – Part 3
8 minutes reading time + video Welcome to a new Open Source Photography Deep Dive tutorial! In this guide, we'll focus on editing with RawTherapee, and I'll show you the simplest ways to get great results quickly. In RawTherapee version 5.11, the 'Toolbox' in the 'Editing' section has nine tabs. One of them is the... Continue Reading →
Deep Dive into RawTherapee and Photo Management – Part 2
6 minutes read + video Once you've downloaded your latest photos to your computer and given them proper names, it's time to sort them and delete any unusable shots right away. Since we shoot in RAW, we’ll do this directly in RawTherapee. A quick note: if you shoot in both RAW and JPEG, you can... Continue Reading →
Deep Dive into RawTherapee and Open-Source Editing – Part 1
6 minutes reading time I can promote RawTherapee (RT) all I want, but if people are set in their ways with certain software, camera brands, and habits don’t allow themselves to take a peek over the fence… well, who knows? Maybe, just maybe, there’s a patch of grass out there that’s greener. Or even a... Continue Reading →
Understanding Version Management in RawTherapee: A Comparison with Lightroom
5 minutes read time Version Management in RawTherapee: A Flexible Approach When it comes to version management in photo editing, Adobe Lightroom offers a history panel and virtual copies, allowing users to revert to previous edits and compare different versions easily. However, this system is deeply tied to Lightroom’s catalog, which has some drawbacks: the... Continue Reading →
RawTherapee’s Graduated Filter Upside Down
Less than 2 minutes to read. The graduated filter in RawTherapee or Lightroom is typically used to correct featureless skies, reduce overexposure in bright skies, or enhance cloud contrast to create a more dramatic atmosphere. In this case, however, I’m using it to recover details in the snow, which became overexposed and lost texture after... Continue Reading →
Stop Overpaying: 120 Reasons to Switch to RawTherapee
Only 5 minutes to read + the first 5 minutes of a video For a while, I’ve been encouraging others to explore RawTherapee—not to push them, but to share my experience. It’s a reliable, user-friendly program that’s often misunderstood as overly complex. In reality, it’s straightforward to use and can save you money by eliminating... Continue Reading →
RawTherapee’s Local Adjustment Tool or Selective Editing
4 minutes read time. The tool, initially called "Local Adjustment Tool" in RawTherapee 5.10, was renamed "Selective Editing" in version 5.11, likely reflecting expanded capabilities. It took me a while to realize the true potential of this tool. I first noticed it in RawTherapee 5.10 but didn’t grasp what a fantastic feature it is for... Continue Reading →
From Good to Razor-Sharp: Mastering Sharpening in RawTherapee
When photographing general subjects like architecture, street scenes, and landscapes, I typically shoot in both JPEG and RAW formats. However, for the past year, when it comes to birds or wildlife, I’ve switched exclusively to RAW. All three of my OM System cameras—the OM-1 Mark II, E-M1X, and E-M1 MKIII—are set to shoot in RAW... Continue Reading →
My RawTherapee Workflow: Denoising Techniques and a Comparison with Topaz DeNoise AI
Before we move on to what was promised on Wednesday about gear for wildlife photography and rain protection, let's first cover the final part of my RawTherapee workflow. In the first part of my RawTherapee workflow, I covered the Exposure section using Adobe Camera Profiles. After that, I discussed Sharpening in RawTherapee, and today we’ve... Continue Reading →
PictureFX Lac du Connemara
For the examples, AI-generated neutral-looking pictures were used. If you have issues with PictureFX LUTs in your software or camera, there is a link below to software that can convert LUTs and adjust them for different types and models of video and still cameras. Here is an AI-generated picture in its neutral state. And below,... Continue Reading →
My RawTherapee Workflow – Sharpen with RawTherapee
After editing my pictures with an Adobe Camera Profile, LUT, Preset, or fully manual adjustments, it's time to sharpen and denoise. My initial plan was to cover both sharpening and denoising in a single article. However, after some thought, I realized it would probably be better and clearer to address them separately, especially since opinions... Continue Reading →
My RawTherapee Workflow – Adobe DNG Converter – Camera & Lens Profiles
Intro Installing the Adobe DNG Converter and Profiles Using and Workflow Intro : In today's article and its follow-up, I aim to explore Adobe Processing Profiles, much like I did earlier this year in "The Raw Advantage – My new Streamlined Workflow". Yet, with changes in my workflow and the availability of a new version... Continue Reading →
Infrared Photography – Glass Filter, Gimp or PictureFX Lut – Part I
Most visitors come to OSP for its Fujifilm recipes list in the Largest Collection. Now that I've pulled the plug on that, I'm curious to see what happens next. Luts are still growing, and Infrared doesn't attract a lot of people, but maybe I have something that will interest some people, and that is… In... Continue Reading →
The Raw Advantage – My new Streamlined Workflow
For quite a while, I had been shooting in both Raw and Jpg. It seemed like a smart approach – capturing images in both formats provided flexibility, allowing me to have the high-quality Raw files for editing and the more readily accessible Jpg's for quick sharing or viewing. However, as time passed, I began to... Continue Reading →
Kodak Ultramax 400 Decoded – PictureFX Lut vs Olympus AI Recipe
Since the Cinestill 800 T AI Recipe proved to be quite popular among many Olympus users, here is yet another recipe created by our friendly Robot Photographer : ChatGPT. This happens to be my second most popular recipe on FreshLuts, namely the PictureFX Kodak Ultramax 400 V2.0. But first ! in an earlier article, I... Continue Reading →
Unlock Your Creativity: Why LUTs Are Changing the Game in Photography
I've been into this story since 2010, starting with Ufraw for Raw photos and Rawtherapee. Trey Radcliff's stunning photos and Nik Efex opened up a new world. I began creating presets for Rawtherapee, inspired by Pat David's Haldcluts. PictureFX Haldcluts launched around 2015. In 2020, I switched to Fuji, diving into .Cube Luts for color... Continue Reading →
New Free Film Simulation Lut : Infrared with PictureFX WhiteIR
Infrared pictures always have something special, I think, but using real IR film to create them can be quite cumbersome. That's why there's this PictureFX digital Film Simulation - and as always, it's FREE ! Like with many Film Simulations, it looks great on one picture but not so much on another. So, it's all... Continue Reading →
14000 Pictures in a Free WordPress account
Well, with this I have probably attracted the attention of some 'free WordPress' users, and many will probably think that this is completely fake, well, the header picture is indeed photoshopped, but the claim is not completely impossible, although an average of 7 a 8000 pictures is probably more feasible. Suppose you post one photo... Continue Reading →
PictureFX Ektachrome 1966 E4 Lut
The use of LUTs is also, and perhaps especially, known in cinematography, much more than in digital photography. Many people want their footage to look like well-known blockbuster films, and the variety of LUTs of this type is overwhelming. The problem is mainly that they all strongly resemble each other, and the used names are... Continue Reading →
New Lut Update – PictureFX Leica M8 Camera Black and White
The Leica M8 remains a highly desirable camera, and it's not just because of its color capabilities; it appears that its Black & White output is particularly sought after. If you're interested in discovering more about this, I can certainly suggest checking out the links provided below. Joshua Wilfred Sekar wrote "An Unlimited Roll of... Continue Reading →
New Lut/Cube Update – PictureFX Leica M8 Camera Standard – FREE download
Intro : Why I created a Lut to simulate the Leica M8 camera jpg output ?Well, although the Leica M8 was not initially regarded as the best Leica camera, it eventually gained popularity and became highly sought after, partly due to its relatively attractive price. Many photographers aspire to shoot with a Leica at some... Continue Reading →