

6 minutes reading time
I can promote RawTherapee (RT) all I want, but if people are set in their ways with certain software, camera brands, and habits don’t allow themselves to take a peek over the fence… well, who knows? Maybe, just maybe, there’s a patch of grass out there that’s greener. Or even a whole field. Just saying.
So, let’s kick off a brand-new series that embodies what Open Source Photography is all about. Whether you’re on Windows, macOS, or Linux, there’s a wealth of tools available. I’ll be giving you a behind-the-scenes look at my workflow with RawTherapee—where I start, what the interface looks like, customization options, and what to do when you need more specialized edits. Do you really need Photoshop? Or can you get away with alternatives? That means we’ll also be diving into GIMP, HDR processing, and more. Lots of questions, and hopefully, lots of answers!
RawTherapee: Where It All Begins
Actually, it starts even earlier—with photo downloading. On Linux, Rapid Photo Downloader is an absolute gem. On other platforms? Well, it gets trickier. There was a time when Windows had a wealth of freeware and shareware for this kind of thing. These days, you’re often stuck with a 30-day trial before you have to pay.
What you really need is software that lets you batch rename files (in this case, photos), add date and time stamps, keywords, and tags. The best free option I’ve found for photo management on Windows is XNView MP. It’s great for sorting, renaming, and organizing – But there are also other, more complete applications, like DigiKam, which combines photo management and editing in one package. A more advanced method that allows for deeper control over your photo management is jExifToolGUI. This user-friendly GUI for ExifTool lets you view, edit, and batch-process photo metadata, including the ability to rename files based on EXIF data.
If you want to learn more about the software mentioned and which systems it supports, you can find the links to each specific program below:
- RawTherapee – https://www.rawtherapee.com/ – Windows – macOS – Linux
- Gimp 3.0 – https://www.gimp.org/ – Windows – macOS – Linux
- Rapid Photo Downloader – https://damonlynch.net/rapid/ – Linux
- XNView MP – https://www.xnview.com/en/xnviewmp/ – Windows – macOS – Linux
- Digikam – https://www.digikam.org/ – Windows – macOS – Linux
- gThumb – https://wiki.gnome.org/Apps/Gthumb – Linux
- jExifToolGUI – https://hvdwolf.github.io/jExifToolGUI/ – Windows – macOS – Linux
If there are readers who know of or have experience with a good viewer/photo manager for Windows or MacOS, feel free to share it, and I’ll add it here. Here’s one from a loyal reader already:
- FastStone Image Viewer v7.9 – https://www.faststone.org/FSViewerDetail.htm – Windows only – but there is an installable, zipped and portable version available. (thanks Ted !)
- IrfanView v4.7 – https://www.irfanview.com/ – Windows only, probably better than XNView ! (thanks Harrie !)
So, now you have an idea of where to start—downloading photos and renaming them efficiently to make it easier to find a specific image later. Personally, I use gThumb alongside Rapid Photo Downloader to keep everything running smoothly.
Getting Started with Rapid Photo Downloader
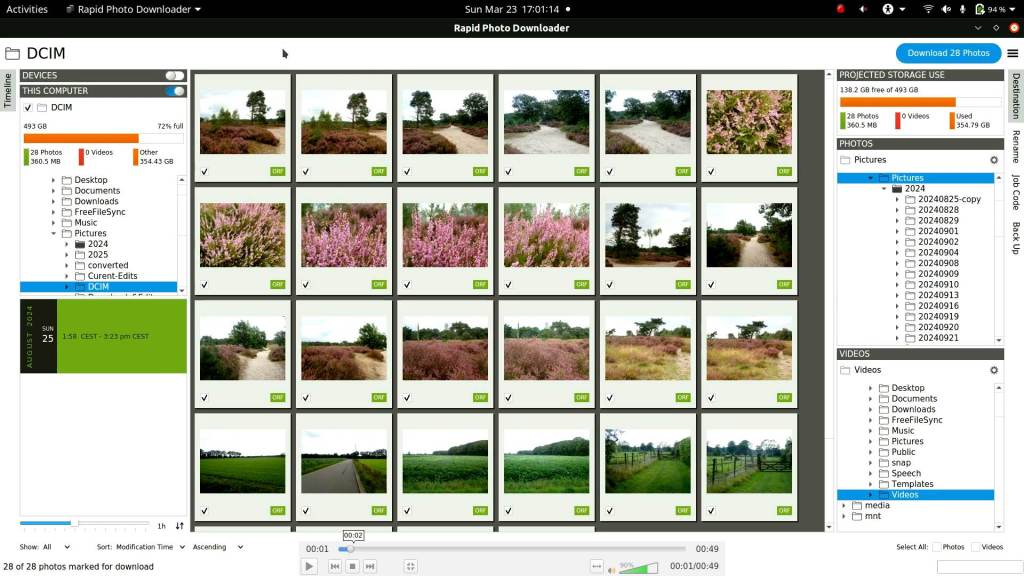
Workflow: Rapid Photo Downloader
- Insert the SD Card
- Plug your SD card into the card reader.
- Rapid Photo Downloader Starts (or Open it Manually)
- The program automatically detects the card.
- Thumbnail Preview Appears
- RPD reads the files and displays a list of thumbnails.
- Each file has a checkbox (uncheck any you don’t want to import).
- Click ‘Download’
- This starts the transfer process.
- Enter a Job Code (Optional)
- Helps organize your files with a project-specific label.
- Choose the Destination Folder
- Select where photos and videos should be saved.
- RPD can automatically sort files by date, camera, or custom preferences.
- Set Up File Renaming (Optional)
- Click the gear icon next to ‘Photos’ or ‘Videos’ to configure renaming.
- You can insert various elements, such as:
- Date & Time (e.g.,
20250324_1430) - Camera Model (e.g.,
LumixG81) - Job Code (e.g.,
forest_walk) - Sequential Numbers (e.g.,
001, 002, 003...) - Custom Text (e.g.,
SpringBirds_)
- Date & Time (e.g.,
- Prevent Duplicates
- RPD checks if files were previously downloaded and avoids duplicates.
- Download Starts
- Files are transferred to the selected folder.
- A progress bar shows the status.
- Done!
- You can safely remove the SD card.
- Your files are neatly organized and ready for editing.
Getting Started with RawTherapee
When you launch RawTherapee for the first time, it might look a bit overwhelming. But don’t worry—you can customize the interface to make it more comfortable and suited to your workflow.
RawTherapee starts in “Single Editor Tab Mode” by default. You can adjust the size of the three sections—Browser, Editor, and Details—by dragging their edges left or right. When you select a different photo, it opens in the same editor window.


You can adjust RawTherapee’s interface and functionality by clicking the ‘Preferences‘ icon. It looks like an equalizer panel, and in the three screenshots above, you can find it at the top of the black bar—on the right side, the second icon from the right. I recommend starting here and going through the options. The first choice you should make under ‘General’ is how you want RT’s layout to look. Of course, you can change this at any time.

I mostly use the ‘Multiple Editor Tabs Mode‘ myself. This allows you to easily compare two or more similar photos, work with multiple versions of the same image, and choose between different edits. Since I reserve “real editing” for RAW files but sometimes shoot in both RAW and JPEG, I exclude JPEG and JPG in the ‘Preferences’ under ‘File Browser’.

You can start using RawTherapee right away, but as I mentioned, I want to give you insight into my workflow. That’s why I find it important to add the tools I use most often to ‘Favorites’ and arrange them in the order I typically use them. This creates a natural top-to-bottom flow in your RT editor.
You can add or remove tools in Preferences → Favorites by checking or unchecking them. Once added, they appear in the right-side Favorites panel, where you can rearrange them by dragging them into your preferred order. If it’s your first time, you might find it difficult at first. In that case, just keep it simple. Start by adding the basics you know you’ll use, such as color management, lens correction, exposure, shadows/highlights, and crop & resize. You can always add more later as needed.

Once the above settings are configured, I restart RT. Then, when I double-click a photo in the file browser, I enlarge the image window by clicking the “Show/Hide Left Panel” icon in the top left corner. This collapses the histogram and history panels. Of course, you can reopen them the same way.
This setup gives me an editor interface like the one shown below, with my favorite and most-used tools. Other tools can be found next to the “Favorites” section, marked with a star icon.

This section focused on how to customize RawTherapee to suit your workflow and how I have set it up for myself.
In the next article, I’ll start working with RawTherapee after downloading my photos to my computer using Rapid Photo Downloader. I’ll go through my RAW files, sort them, and delete the bad ones. RawTherapee actually has some useful features for this that many users overlook.
The next step will be editing a photo and learning how to edit multiple images at once.

I hope this article has been insightful and that you found it useful!
This article was written by Marc R.
While I primarily speak Dutch and have some knowledge of English and a little French, ChatGPT helps ensure my writing is grammatically correct. I often mix Dutch and English in my drafts, and ChatGPT steps in to translate and correct.
Writing articles like these takes a lot of effort, so please keep the following in mind:
I don’t have any Sponsoring Companies, Patreon support, or Follower Donations.
I don’t drink Coffee, well, I do … but not the financial form you sometimes find on other websites, like ‘buy me a coffee’ 😊
However, what I truly need to keep going is Motivation, and the best part is, it won’t cost you a thing. You can offer it for free – just hit the Like button and Subscribe !
Discover more from Open Source Photography
Subscribe to get the latest posts sent to your email.


I really want to give RawTherapee another go, but I’m thinking of using the ART fork version as they have added a lot of additional functionality to it. Is that something you have tried Marc?
LikeLiked by 1 person
Well Mark, I tried it about two years ago, and sure, there are some advantages. But my main reason for sticking with RT is the large community behind it. If you run into problems or just have questions, that makes a huge difference—more people use it, and development is more active.
I rely heavily on RawTherapee, so for me, it’s the better choice. That said, if I weren’t already so familiar with it, testing out another version would definitely be worth considering.
LikeLiked by 1 person
i use Darktable a lot. Last time I looked at raw therapy I was overwhelmed!
i hear a lot of good things about it’s fork, ART but to use ART you need to know rawtherapy. So I will follow your tutorials so I can get a better understanding of both.
thanks
LikeLike
Thanks, Barrie! A new program always seems complicated at first and can feel overwhelming, but you’ll get the hang of it much faster than you think. Later, you’ll probably wonder why you ever worried in the first place! 🙂
LikeLike
Just to throw another software into the mix…FastStone viewer for windows is a free, donation requested, image viewer and simple manager. The program is Windows which fills a need on that platform. I use it for initial image viewing and culling. Has some basic edit functions. Some Windows users may need to also download an image codex for the Microsoft store, it’s a no brainer. The program is lightning fast.
LikeLiked by 1 person
Thanks for the info, Ted! I’ll add it to the list in the article – really appreciate it!
LikeLiked by 1 person
Thanks, Marc. I have installed RT on the laptop that goes with us on holidays. I have managed to proces a few RAW’s into the JPG’s I wanted; but it has not grown on me yet.. 🙂 The viewer-wit-a-little-more I use is Irfanview for Windows. https://www.irfanview.com/
LikeLiked by 1 person
Thanks Harrie – en indeed ! I forgot Irfanview – even better than Xnview I think. Thanks, I’l add it to the article.
LikeLiked by 1 person