

Read this six-minute tweak for RawTherapee, and get a total workflow upgrade.
A Fresh Start with RawTherapee: Setting Up Your Favorites for a Smarter Workflow, and Color Management with Adobe Camera Profiles.
In a previous article, we talked about ART and other RawTherapee forks. One thing ART definitely has going for it is a simpler interface — it looks a bit friendlier, less overwhelming than RawTherapee. But honestly? That shouldn’t be the reason to choose ART over RT.
The real issue isn’t that RawTherapee is to overwhelming or has too many tools. The problem is that you haven’t made it yours yet. So today, we’ll go through the two most important steps to get started with RT without the headache — no endless searching, no confusion. Just a clean, streamlined setup. I’ve reset my own RT version to show you how, with screenshots, text, and video.
“With Favorites, you don’t need to dig through different tabs to find your go-to tools — they’re all in one place, in the order you like. It’s your workflow, your way”
Step 1: Set up your personal workflow using Favorites
Once RawTherapee is installed and launched, click the Preferences icon — it looks like a little mixer with slider knobs. Under the General tab, you can choose how RT should launch: either in a single editor tab (default), or with multiple tabs. I personally use the multiple tab mode, but it’s not a critical setting — and you can always change it later.
What is critical, though, is setting up your Favorites. This is something you can’t do in ART, and to me, it’s what separates ‘a cluttered interface from a clean, efficient one‘. With Favorites, you don’t need to dig through different tabs to find your go-to tools — they’re all in one place, in the order you like. It’s your workflow, your way.
Whether you’re brand new to RT or looking for more structure in your editing, here’s how to get started:
- Open the Preferences window
- Go to the Favorites tab
- On the left, you’ll see the full list of available tools (just like in the main tabs)
- On the right, it’s empty — this is where your custom list will appear
- Check the tools you want to use — they’ll automatically show up on the right
- Sort them using the arrow buttons, or just drag them into place
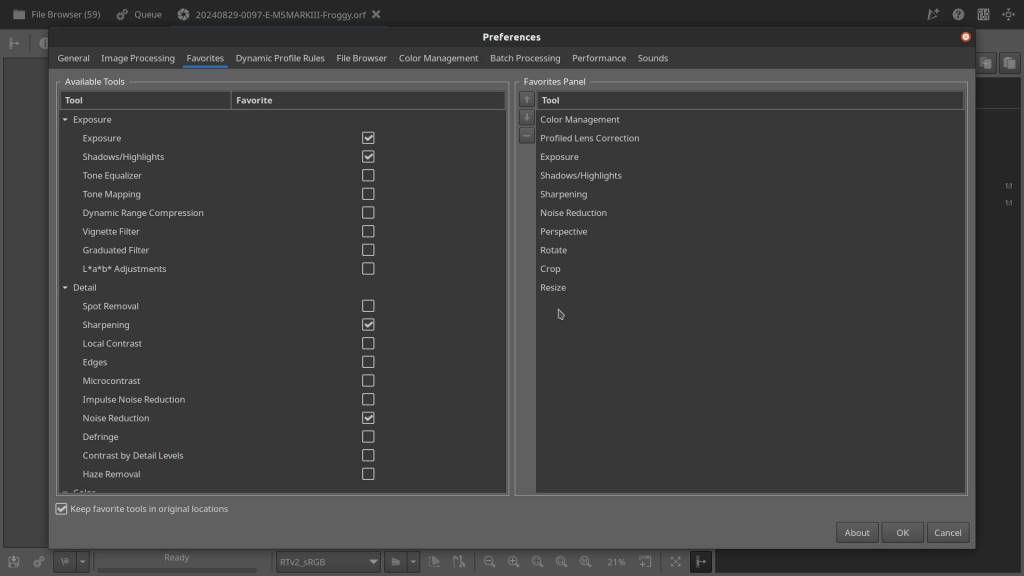
Here’s my personal list of the 10 essential tools — a solid foundation for any workflow, whether you shoot landscapes, macro, or portraits:
- Color Management
- Profiled Lens Correction
- Exposure
- Shadows and Highlights
- Sharpness
- Noise Reduction
- Perspective
- Rotate
- Crop
- Resize
This list of 10 favorite tools isn’t random — each one is a key building block for a smooth, logical editing workflow in RawTherapee. From color management to cropping and sharpening, the order follows a natural editing flow: from color setup to final output. It gives you full control, all in one tidy place. No more jumping between tabs. Just focus on what really matters: your image. Feel free to tweak it, but if you’re not sure where to begin, this list is a great starting point.
Instruction video:

“A much richer and more visually pleasant starting point for your edits — often surprisingly close to what you saw on your camera’s screen, without having to tweak for hours”
Step 2: Set up Color Management with the Adobe DNG Converter Camera Profiles
Many photographers rely on camera-specific color profiles — whether it’s the default ones from the manufacturer, those baked into Lightroom or Photoshop, or the Adobe Camera Profiles (DCPs). What most people don’t realize is: you can use these same profiles in RawTherapee — and it only takes a few easy steps.
All you need is the Adobe DNG Converter. And the best part? You get three perks in one:
- The converter itself
- Access to Adobe Camera Profiles
- Plus the Adobe Lens Profiles
But first: Is your camera supported by RawTherapee?
This is a question I’ve received a lot since launching the Deep Dive series. The short answer? In almost every case, yes.
I won’t throw percentages around, but in all the years I’ve used RT — and all the cameras I’ve owned (it’s a long list) — there was only one instance where I had to wait a couple of weeks for support. And even then, I simply used the DNG Converter to get going.
So no worries — this tool is not just a bonus; sometimes it’s essential. Even paid software occasionally runs into the same waiting game.
Installing the Adobe DNG Converter
- Visit the official Adobe page:
👉 https://helpx.adobe.com/camera-raw/using/adobe-dng-converter.html - Download the version that matches your system:
- Windows 10/11
- macOS v13 or later
- Linux users will need to install Wine to run the converter
- Download the installer, double-click, and install to the default location
- Once installed, you can close the converter — we only need the profiles it includes
Where to find the profiles
- Camera Profiles:
C:\ProgramData\Adobe\CameraRaw\CameraProfiles\
Inside, you’ll find folders likeCameraandAdobe Standard - Lens Profiles:
C:\ProgramData\Adobe\CameraRaw\LensProfiles\1.0\
On macOS, the paths are different — just use Finder and search for “Adobe” or “CameraProfiles” to track them down.
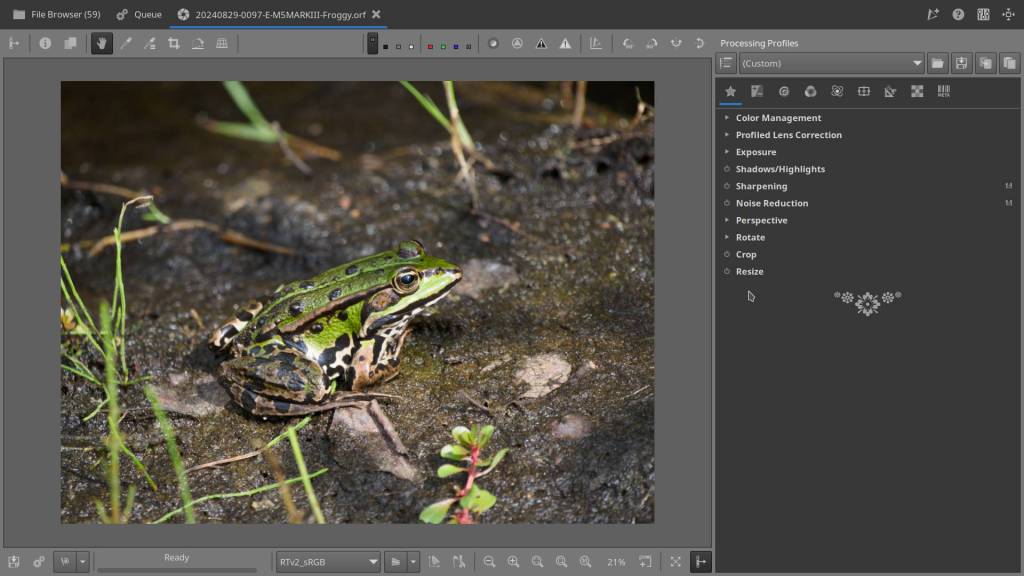
How to use Adobe Camera Profiles in RawTherapee
- Re-launch RawTherapee
- Open a RAW photo
- In the right panel, go to your Favorites tab (the star icon)
- Open Color Management
- Under Input Profile, select Custom
- Click the folder icon next to the Folder field
- Navigate to the
CameraProfilesfolder listed here above - Find your camera brand and model
- Select a profile from the list (e.g., Adobe Standard, Camera Vivid, etc.)
- Activate Look Table and Tone Curve checkboxes
And that’s it! You’re now using the same color profiles that Adobe apps rely on — all within the open-source ecosystem of RawTherapee.
DCP vs. ICC in RawTherapee – why it’s worth knowing the difference
If you’ve been working with RawTherapee for a while, chances are you’ve come across ICC profiles. But why would you switch to using those Adobe DNG Camera Profiles (DCPs) instead?
Well, it comes down to flexibility and refinement.
ICC profiles are pretty straightforward: they carry a static color matrix for a specific camera, often linear, with no extra frills. Great for a neutral starting point — but that’s about it.
DCP profiles, especially the ones from Adobe, are a different breed. They don’t just contain precise color matrices, they also include:
- a Tone curve that give a more natural contrast and brightness roll-off
- a Look table for that typical camera color look
- And often a set of ‘looks’ like Adobe Standard, Camera Vivid, Portrait, Landscape…, tailored to specific camera sensors
The result? A much richer and more visually pleasant starting point for your edits — often surprisingly close to what you saw on your camera’s screen, without having to tweak for hours.
Of course, ICC profiles still have their place — especially if you build your own or need a clean, neutral base for a consistent workflow.
But if you want to squeeze the most out of your camera, and save time getting to that “just right” color feel, giving those DCP profiles a spot in your RawTherapee toolbox is absolutely worth it.
As always at OSP: try it out, see what fits your style and your camera. That’s what it’s all about in the end — your workflow, your image, your choice.
This article was written by Marc R.
While I primarily speak Dutch and have some knowledge of English and a little French, ChatGPT helps ensure my writing is grammatically correct. I often mix Dutch and English in my drafts, and ChatGPT steps in to translate and correct.
I don’t have any Sponsoring Companies, Patreon support, or Follower Donations.
I don’t drink Coffee, well, I do … but not the financial form you sometimes find on other websites, like ‘buy me a coffee’ 😊
However, what I truly need to keep going is Motivation, and the best part is, it won’t cost you a thing. You can offer it for free – just hit the Like button and Subscribe !
Discover more from Open Source Photography
Subscribe to get the latest posts sent to your email.


Mine would be, in order :
1. Crop
2. Exposure
3. Shadows and Highlights
4. Noise Reduction
5. Resize when exporting
Profiled Lens Correction – automatic!
No need for: Sharpness – since the noise reduction does it 🙂
Perspective – never used this one
Color Management – sometimes, but mostly no 🙂
LikeLiked by 1 person
Lightroom ?
LikeLiked by 1 person
Yes, yes… I get that!
For me, the process is pretty straightforward—I import my images using Lightroom, then sort and edit them right away. The tricky part is that I usually know the feeling I want the photo to convey… but I often struggle with how to actually achieve that look.
LikeLiked by 1 person
Well, everyone is different of course – but for me, it took years to find the right camera, the main subjects, the way of photographing, and ultimately, the right flow that brings everything I shoot to a result that I’m satisfied with and that suits me best.
LikeLiked by 1 person