

Over time I learned that the best and fastest way to make film simulations without getting frustrated is to start simple.
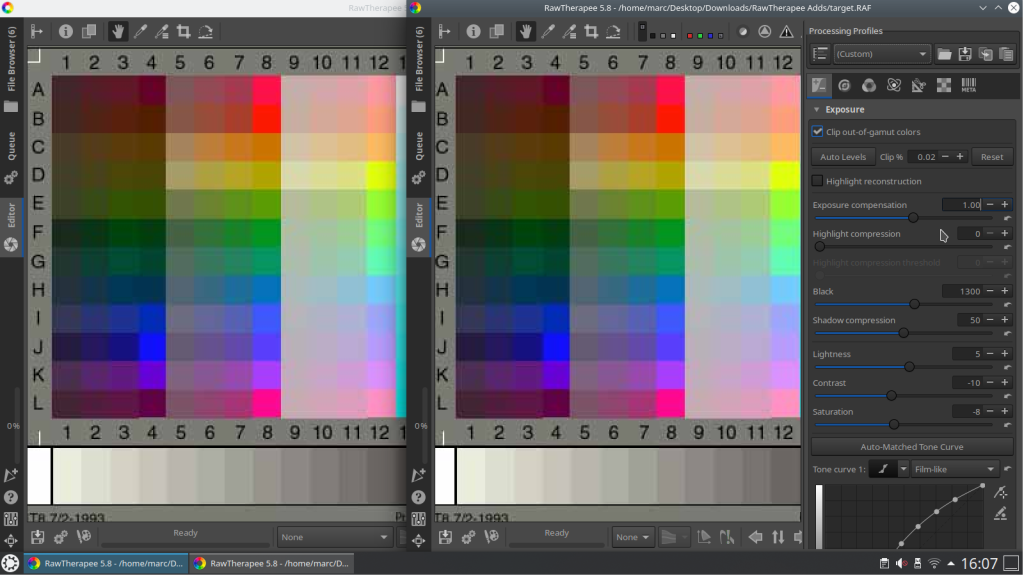
A method that works very well is the comparative method – two instances of Rawtherapee open on top of each other.
It is also very important to know some adjustment and setting methods in Rawtherapee, it can make everything a lot easier and also help you to work faster.
The method used here to make “film simulations” is not very different from the method you should follow to edit RAW pictures in a normal Workflow, and it is not that difficult either. I regularly read on forums how difficult Rawtherapee is to work with when it is not at all. True, it can be a bit overwhelming when you see all those tabs and sliders – checkboxes, but that’s just the same in any other image editing program.
The learning curve is in fact very easy, and almost all editing can be done in the “Exposure” tab, and that’s where we are going to start too.
Basic development techniques and creating a Color film simulation profile/preset :
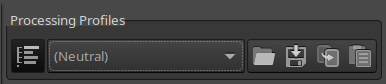
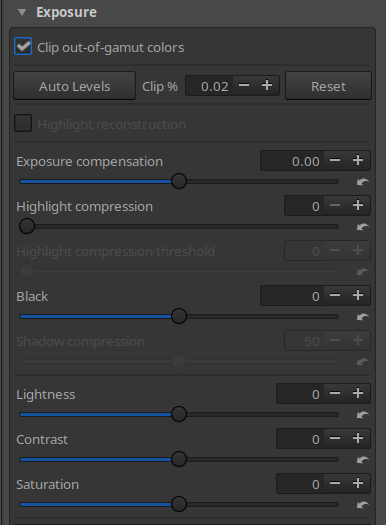
This is what your exposure tab should look like when you open a new picture. Make sure that the second button above is set to “Neutral”. If you start from scratch or want to load a new profile/preset, curve or Lut, always set it back to “Neutral” first. This way you avoid that any previous settings remain and influence your next or final result.
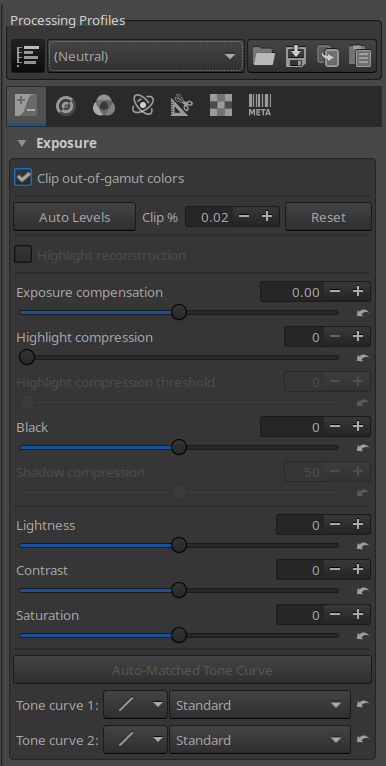
This button is not only a Neutral button but actually has several settings, one of which is the “Bundled Profiles” setting. Many Rawtherapee users try to get there own profiles also in this menu – also due to the many “how to’s” out there to save Profiles or Presets in that menu. However, it is very cumbersome and not really user-friendly to use this menu and storage location for what we are doing.
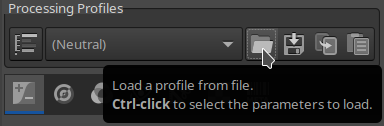
Much easier and more accessible is simply to create a folder on your computer in which you can store all your Presets. The button to open that folder or actually any folder is the second button next to the Neutral, this is the “Load Profile from File” button.
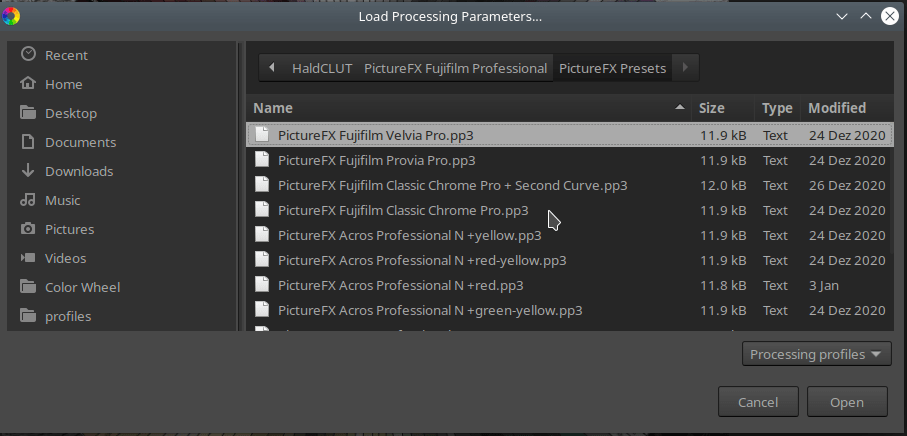
You can use this button in two ways:
just click on the button and load your profile/preset, all settings in this script will be loaded.
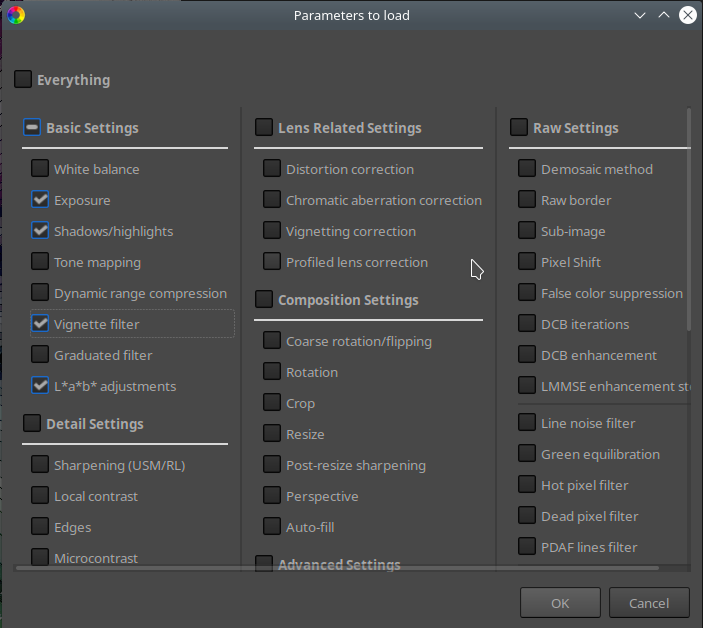
Or do “Ctrl + click” – select the profile/preset and a menu will open where you can select which settings you want to load.
Important : A Profile or Preset is the equivalent of a Script in the IT world. A programmer writes a script that forms a program or executes a specific action. Our profiles here are just the same, they contain text that is converted into an action.
A programmer always keeps his scripts compact and neat. Many users of Rawtherapee, and for that matter any program that is script driven, don’t.
Almost all presets you can find on the internet are books in size, while they sometimes perform only one or very little actions.
On the other hand, they can contain actions that are not intended at all or that you not want – sometimes the creator just missed this during the creation of his profile / preset, and left some unwanted actions hidden in them.
These types of profiles are difficult to use for analysis or adaptation, for example if you wanted to adapt such a script to your needs.
That’s why the actions you can take to save or load a Profile/Preset partial, are super important!
They can save you a lot of time afterwards when you want to find errors or make small adjustments or copies.
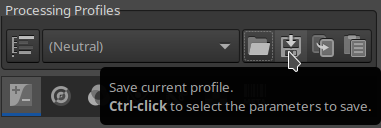
The “Save Current Profile” button next to the Open button works the same way.
If you want to save a setting or create a Profile / Preset, just click on this button and all settings will be saved.
Or do “Ctrl + click” and indicate which settings you want to save.

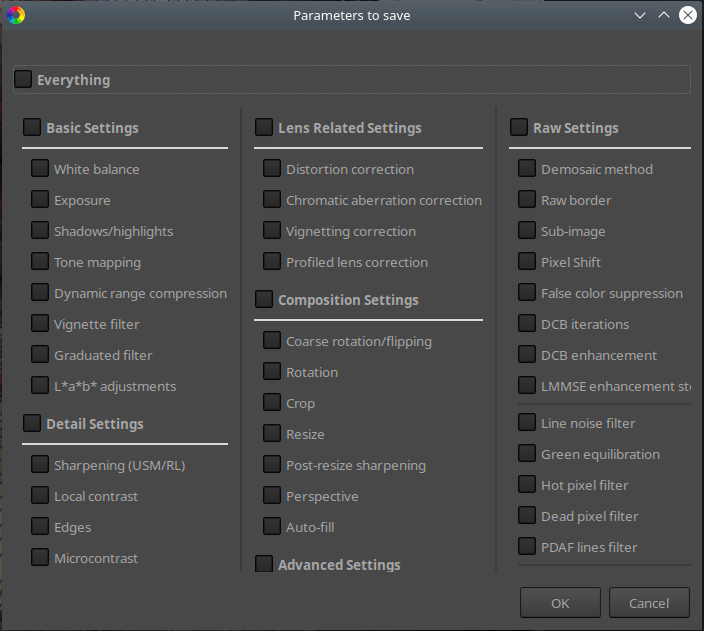
Below an example of a complete Profile / Preset (see the list of the pages on the right side) it can easily be 100,000 bits and more in size

And below an example of a partial Profile / Preset (only one page in the list on the right) and only 500 bits in size !
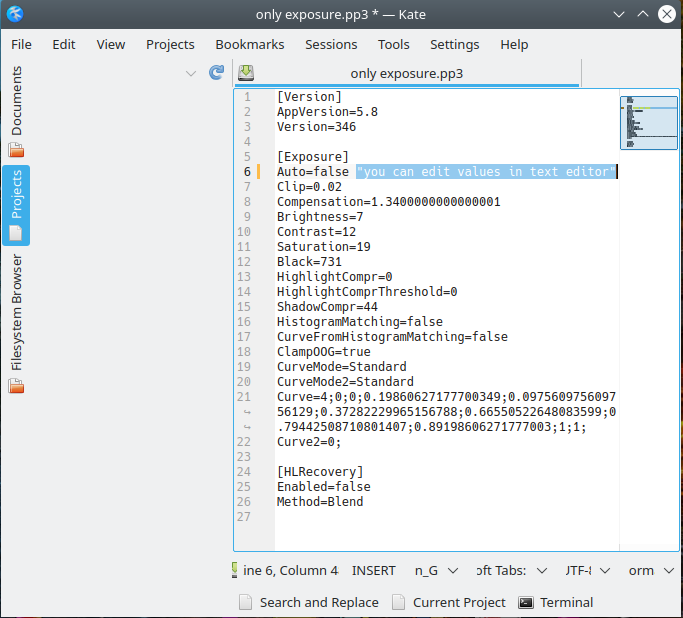
Also pay attention to the blue selected piece of text that I typed in the script “you can edit value ..”, the nice thing is that you can edit a script yourself without having to change and save all the settings in RT. For example, you can adjust the auto exposure setting yourself from “false” to “true” or any other setting in the list.
You can also create different scripts yourself by copying one and then making adjustments.
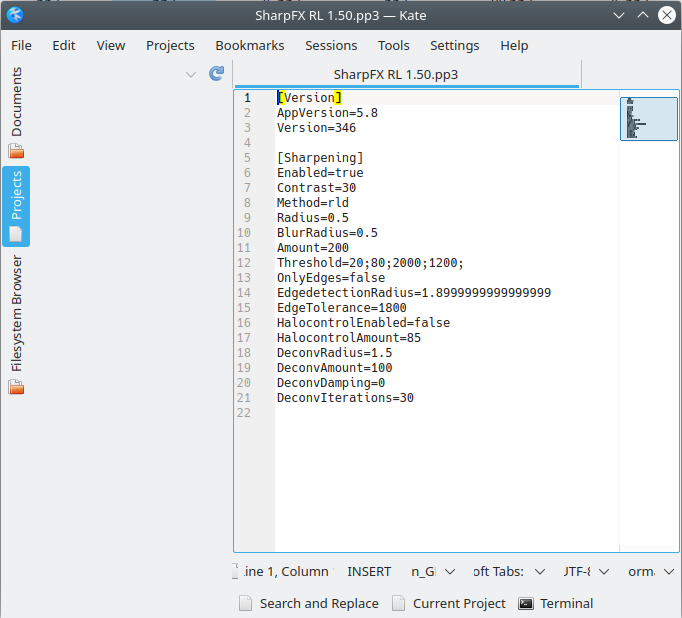
Partial Profiles/Presets (mini scripts) are very handy, for example you can make a script to sharpen only, or a denoise script, everything is possible. An example of a sharpening script below.
Profiles / Presets are saved with the extension .pp3, they are also called sidecar files. When you want to save a picture in Rawtherapee, you get a checkbox in the Save menu : save processing parameters with image, ultimately these are no different than a profile / preset, they contain all the settings you have made for that particular picture.
To open a profile / preset – sidecar file you need a simple text editor.
In Windows you can use Notepad, and a very handy one for Windows is Notepad ++ https://notepad-plus-plus.org/ but there are many more.
In Linux I use Kate https://kate-editor.org/
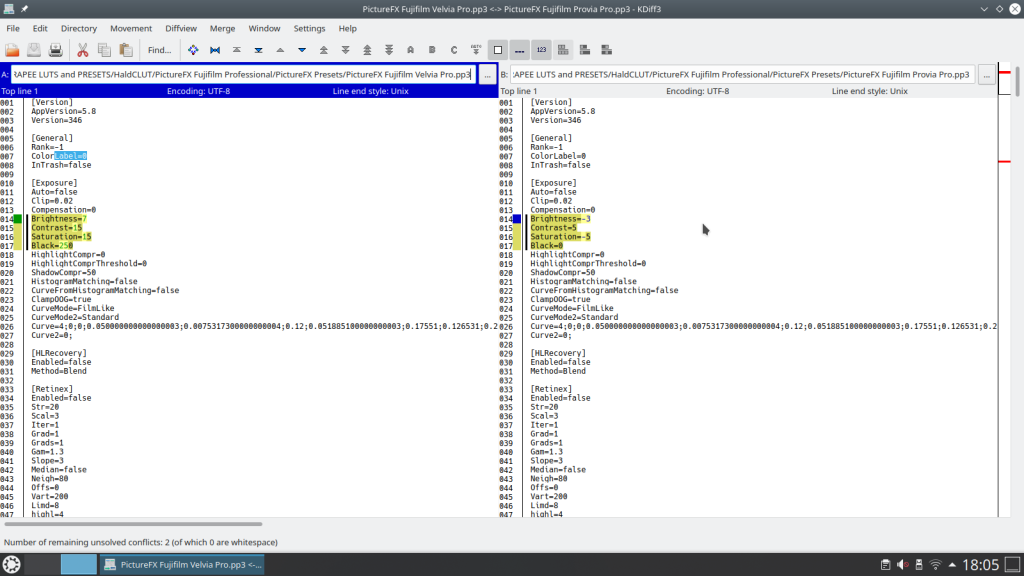
Another almost indispensable tool is a text comparison program.
I myself use KDiff3 http://kdiff3.sourceforge.net/ , another well-known is DiffMerge https://sourcegear.com/diffmerge/ , both are available for Windows, Mac-OS X and Linux.
The purpose of this program, as the name says, is to find the differences, which can be very useful.
Suppose you want to download my Presets and use and possibly adjust it yourself, you can then create a preset on your own computer in Rawtherapee that contains no actions and compare it with my preset. You can then immediately see which adjustments I have entered to obtain a certain effect, or maybe just to see which values differ between two film simulations.
Another important button for loading your Profile / Preset is the first button just before the Neutral button, this is the “Processing Profile Fill Mode” button.
By clicking on it you will see that the icon is full or partially filled, which is exactly what happens with your Profile / Preset.
Suppose you leave the button on Full, an uploaded profile / preset will then be considered complete (even when partial), and will overwrite all previously made settings.
If you set the button to Partial, it will only load your partial profile / preset, and will not overwrite all other previously made settings.
This can be very important when you want to create a profile / preset made up of several previously partially saved actions.
See below the different positions of the button – notice the icon, left Full profile – right Partial profile :
Now that you know how to save and open script driven actions (what profiles/presets actually are) and how to maintain them, you can start creating professional looking scripts that will lead to the creation of the finest Film Simulation Luts.
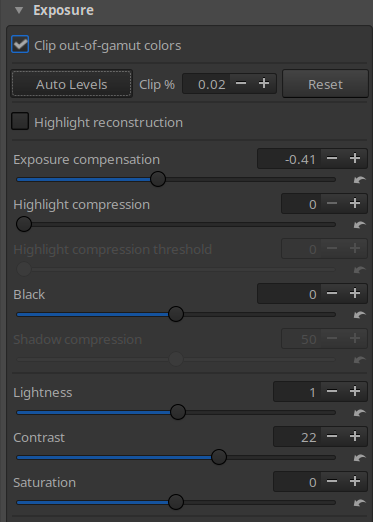
As explained in the previous workshop, overlap two instances of Rawtherapee, and start in the Exposure tab.
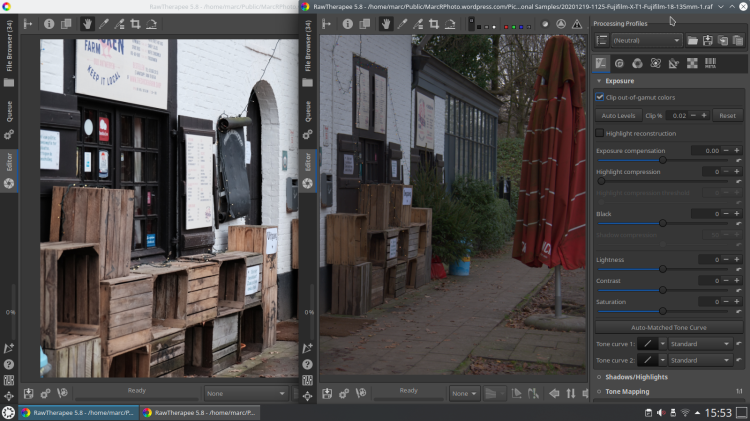
There is nothing wrong with using the “Auto Levels” button, in fact it may even make it easier for you to start your comparison.
As soon as you change any setting in Exposure, the Auto Levels button will go from pressed to its normal position – the “true” indication in your script will change to “false” – so you can make further adjustments and save them, without activating the “Auto Levels” button again afterwards.
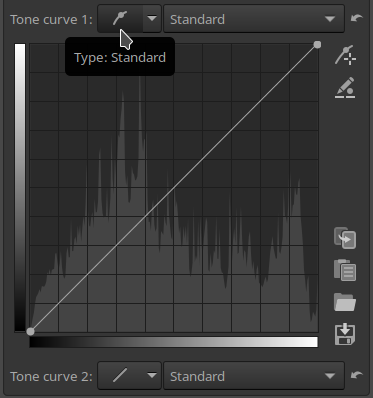
The next step and before making further adjustments is to make or upload a “Film Curve” first. If necessary, take one of the Curves included in this article.
You can upload an existing Curve via the “folder” icon at the bottom right. Just below is the save button in the form of a “disk” icon.
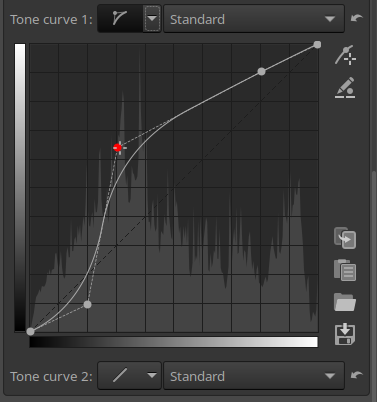
The first step to open or create a curve is to change the curve type (indicated by the cursor in the example below) from linear to standard, flexible, parametric or control cage.
The most used is probably the flexible curve, as the name says it can be used very flexibly, much better than the standard curve. You can see some examples below. There is also the parametric curve, which only works with values that have to be entered, which can work very precisely. Finally, there is the control cage where the curve is adjusted by as if it is attached to a rubber band, thus stretching the curve.
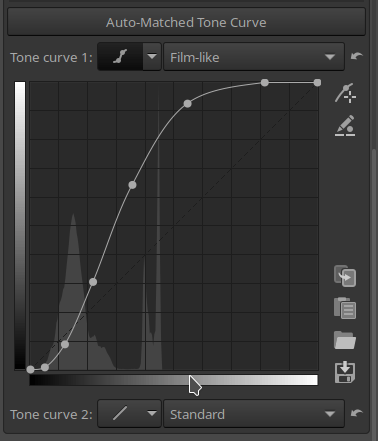
Have you never seen a Film Curve? then you can optionally press the button “auto matched tone curve” with an opened RAW image, at least you have an idea of the shape.
The curve is formed by placing control points on the straight line or linear curve. Each control point can be shifted in any direction, and you can add as many control points as you wish.
In addition to the Curve type button, there is also a second button that influences the way of effect on the picture that the curve affects.
The options are: standard, weighted standard, film like, saturation and value blending, luminance and perceptual.
You just have to try this one, you will see that one has more influence on the contrast, the other on color or brightness.
You will understand that this is a tool that has a major impact on the end result – so experiment!
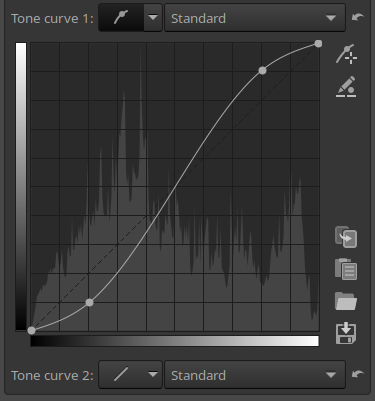
easy to make an S curve with only two control points
but a third control point on the standard curve is difficult to control, the curve then moves in all directions uncontrollably.
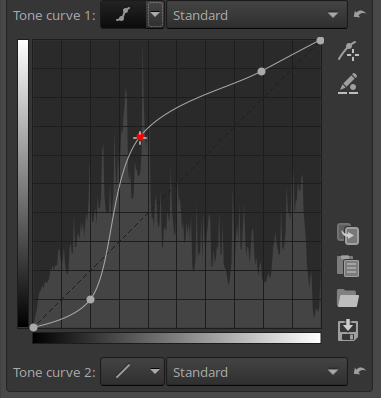
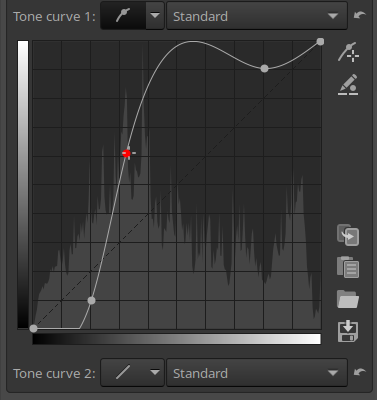
on a flexible curve you can work with multiple control points, and still easily maintain control
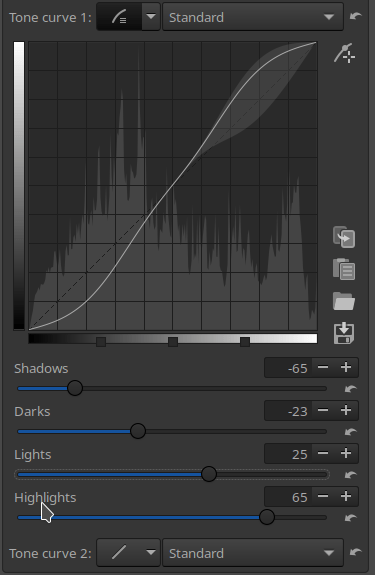

to adjust the parametric curve you cannot place control points on the curve, but you have to do this by entering values in four subdivisions of light, more specifically shadow, darks, lights and highlights.
The control cage curve is a bit like operating a bow and arrow. I personally prefer to use the flexible and the parametric curve.
You can also make a second curve, the advantage of this is that you have more fine control, and you can also use different curve modes. For example, you could make the first curve “flexible” and “film like” and the second curve “parametric” and “saturation and value blending”. Working with curves takes some time to get the hang of it, but you will also notice that this is a very powerful tool with which you can give your entire image a different look. Was this just not what we wanted to achieve? The Analog Film Look.
Ok, now put all the above into practice, and try to match the two images by using the other settings in the Exposure tab combined with the curves.
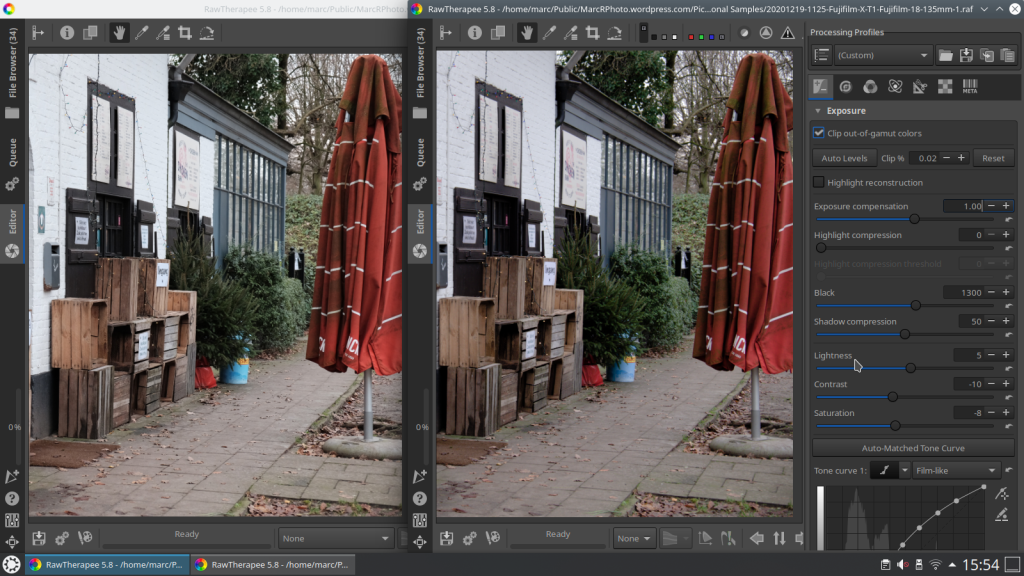
In brief:
- load picture(s) and set neutral
- use auto exposure button
- load curve
- then set exposure correct – equal to the target picture
- start adjusting sliders: saturation, contrast, black, lightness and curve-> observe the effects and adjust
- if necessary load 2nd curve
When that is done, you can try to save all this in a (partial) profile / preset,
Tip : If you are (still) inexperienced in trying to create partial profiles, or if you are unsure, create one full profile and one partial. Put both of these in the text comparison program, so that you can copy or merge any forgotten elements from the script with the partial script. This is also very useful to find out which checkboxes should be activated for certain Actions.
More explanation about the different curves and curve modes, or any other part of Rawtherapee can be found in the Rawtherapee Rawpedia.
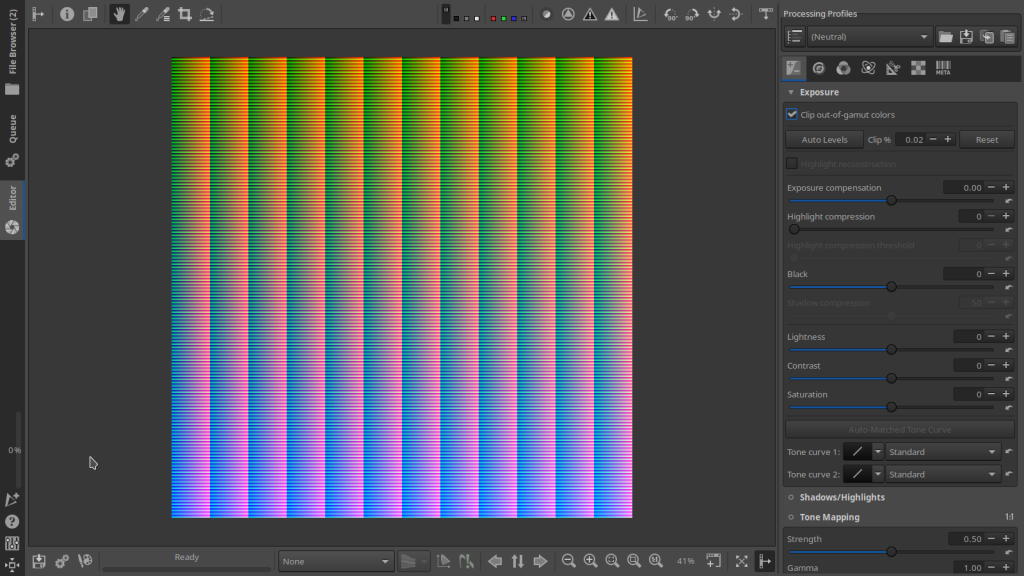
Pictures and Calibration Targets :
It would be simple to think that with one picture you could make a film simulation that can be used for many pictures.
I used a few different ones to get an acceptable comparison, but what will definitely help you in the right direction are color target cards.
And I mean the type that are used for adjusting or calibrating your monitor.
Not with the intention of scanning your monitor to get an exact comparison needed for the film simulation, because those kinds of scans just don’t exist – at least none that automatically adjusts all your settings in Rawtherapee.
But because these cards have a whole range of color tones, the comparison can be made much more accurate.
Buying these color and grayscale target cards can be expensive, but we do not need color target cards that have to meet certain standards. All we need are two digital images, one of which is shot with the target film simulation, and one regular RAW to make the comparison.
And that can be done in many different ways : color patterns and/or cards can be found for free on the internet, you can even use a childrens magic markers on a white background. Then you can print them – scan them – photograph them – put them on your screen and photograph … Different possibilities to arrive at the same comparison.
Whether your monitor needs a calibration or not is a completely different story, this application only aims to compare and match colors between two pictures.
Below a comparison between a Classic Chrome jpg and a RAW – notice that a difference in background brightness in the third picture, can also cause a difference in color, it’s a matter of continuous adjustment
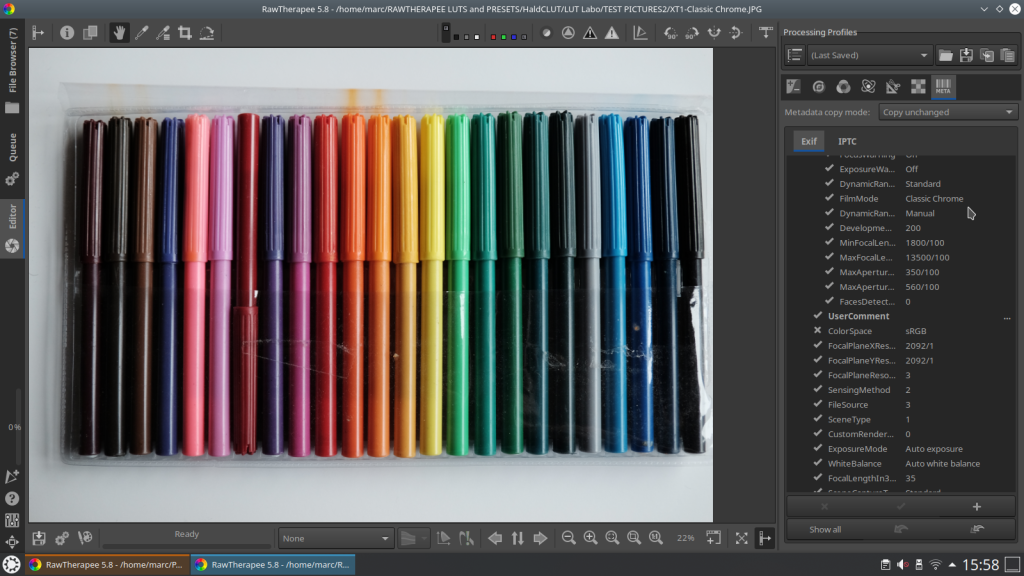
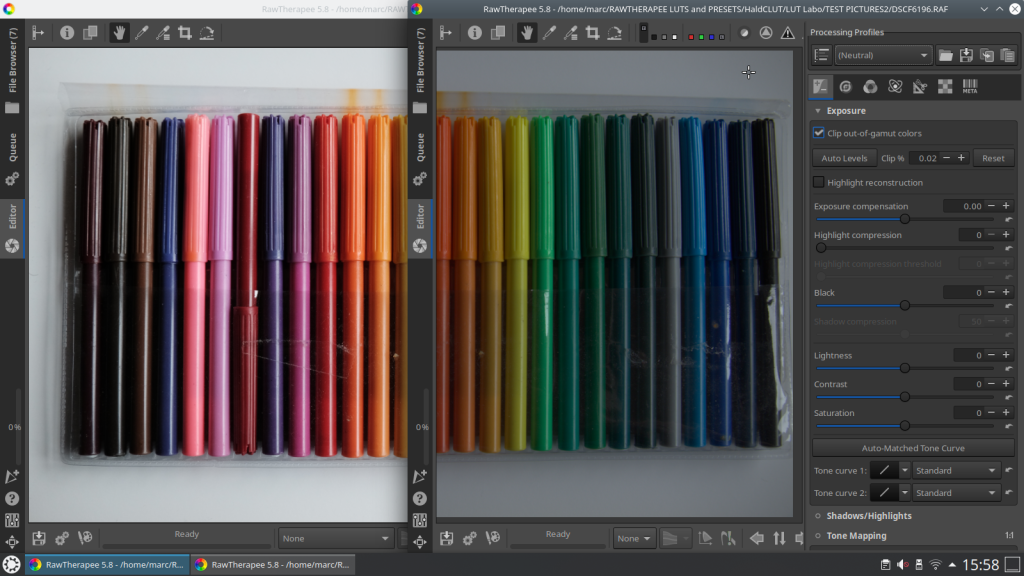

using screenshots, sharpness is not important, color difference is
full spectrum wallpapers
creating custom color targets

Let your creativity guide you, it doesn’t have to cost money.
Below some links to sites where you can find color cards and the like.
- XRitePhoto.com
- https://www.amateurphotographer.co.uk/ : take better photos with AP’S free camera targets – recommended !
- Color wheel by Wolvenhyde
- Targets for color calibration – http://ffscat.csail.mit.edu/ffshtml/texts/FFSttarg.htm – Attention, this is not https, so search at your own risk – I did, but i’m using linux.
- and many more – Google is your friend!
Other ways to make subtle color adjustments :
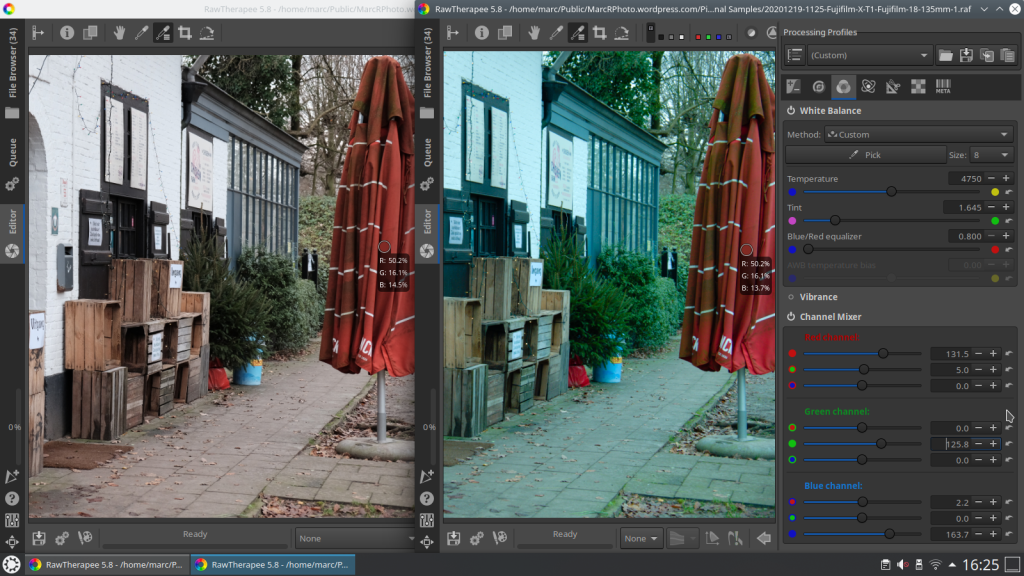
Besides the adjustments in the Exposure tab, you can go even deeper into more subtle color adjustments in the Color tab. This is possible in the White Balance, Channel Mixer and RGB Curves.
I personally find using the White Balance less effective, although you can make extreme adjustments here, for our purpose I would just leave it on automatic or camera.
The Channel Mixer, on the other hand, is a much more effective tool, but difficult to work with. This is also just something you should try to see if you like it or not.
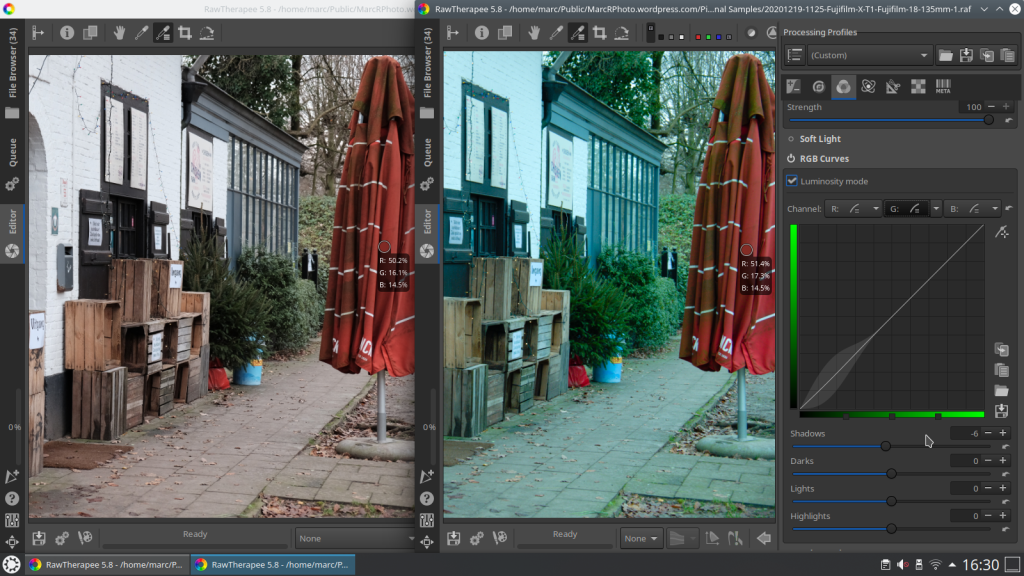
RGB Curves: here you can only choose the type of curve, but you can adjust shadows, darks, lights and highlights in the separate Red, Green and Blue colors.
Again, the standard curve is less convenient to use, I prefer the flexible and parametric curve myself.
These two types of curves in the RGB tool are invaluable for influencing color patterns, and I would recommend this tool if you need to make more detailed color adjustments.
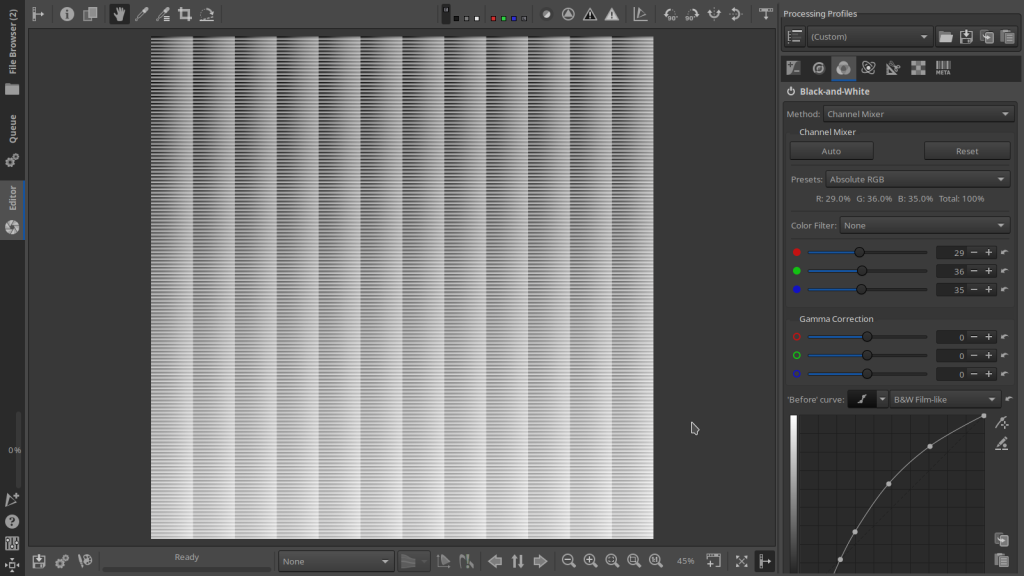
Creating a Black and White film simulation profile/preset :
Of course there are also B&W film simulations.
The Black and White tool is also located under the Color tab.
Three possible settings: desaturation, luminance equalizer and channel mixer.
Using desaturation also gives you access to the other coloring tools, the luminance equalizer is effective but difficult to work with, my absolute favorite is the Channel Mixer :
There is an Auto button that adjusts the RGB values according to the picture taken.
A large list of pre settings for ortho, panchro and others types.
Apply color filters.
RGB mixer settings (film values can be found on the internet, or my previous blog)
Gamma Correction settings
A “Before Curve” with settings as in the Exposure tab, and an “After Curve”. Making a simulation with the channel mixer in B&W is very similar to the method explained here for the color simulation. There are sufficient resources to tune the image exactly the way you want it, and yet it works fairly easily.
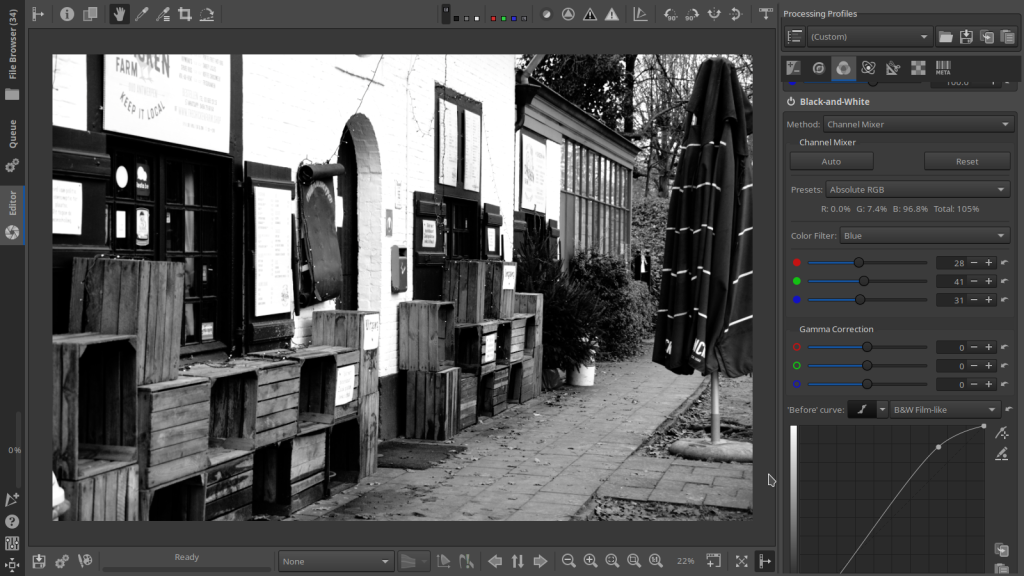
In this example a film simulation for Ilford FP4 with a blue filter.
Method: Channel Mixer
Preset: Absolute RGB
Color filter: Blue
Mixer settings for Ilford FP4: 28-41-31
Load the supplied B&W Film Curve
In order to arrive at a correct comparison, you would have to take a photo with an analog camera loaded with FP4 and a glass blue filter mounted on the lens, scan a photo or scan negative and compare with a normal digital RAW.
Or just enjoy your creation and don’t worry about it.
Create a HaldClut or Lut from Profile / Preset :
Find and open the following Lut provided in Rawtherapee : Hald_CLUT_Identity_12.tif
To be sure to undo any previous conversions set to Neutral in the Exposure tab.
Go to Load Profile from File, find and open the desired profile/preset – the HaldClut identity file will change to the loaded settings.
Click on the “Save Current Image” icon – bottom left.
Rename to an appropriate file name and set “file format” to PNG 16bit
Save to the assigned HaldClut Folder (equalizer type icon, left botom, preferences -> image processing -> directories -> HaldClut directory)
Restart Rawtherapee and find the new Lut in the “Film Simulation” menu in the Color tab.
Important : What you should know is that some settings in RawTherapee cannot be transferred to a HaldClut or Lut. These are for example, Tone Mapping, Vignette and Graduated Filter, but also Sharpening and Noise Reduction. This is one of the reasons why it is sometimes better to use a profile or preset.
You also will notice that when you compare pictures that have been edited with a Preset and Lut, that small differences occur, especially when your settings in your preset become more extreme, for example with an infrared simulation.
A better way is to combine Luts and Profile/Presets.
Tip : In the beginning of the article – opening and saving profiles / presets, I already talked about having a dedicated folder for Presets and Luts.
Many people have trouble finding or saving presets etc. on their computer, this is because Rawtherapee creates a folder under the system files, not really a problem, but Windows is sometimes difficult when it comes to rights and access, this can also cause problems in Linux or Mac OS X, and not everyone knows how to deal with that.
Yes, it is nice if everything in Rawtherapee ends up in the “list”, but for Luts that is no problem. And also the open/save buttons for the presets always refer to the last used folder.
So do yourself a favor: just create a new folder for Presets and Luts on your computer – preferably separately from each other, otherwise the presets will also appear in the list of the luts, which is not very convenient. So just create a folder for example “RT” and in it one folder for Luts and another for Presets. Now you only need to assign the new Lut folder to Rawtherapee, which I have written here a little earlier.
Below you can find the downloads. The holy grail, the Presets that served as prototypes for the new PictureFX Luts and a whole bunch of different types of Curves. Lots to play with!
But remember, a Preset or Lut is ultimately one action that changes your picture, but depending on the subject, lighting and a lot of other factors, it is or may be necessary to fine tune your picture.
The Presets Pack contains all the presets used to create the new PictureFX Pro Series Color and B&W.
Note: these are full presets, not mini scripts,
they are meant for experimentation and learning :

The Curves Pack contains five folders with RGB, Control Cage, Flexible, Fujifilm and After Curves.
They are meant for experimentation and learning.

A lot of work went into writing this “manual”, even the research that went into developing the Presets and Curves ended up taking a lot of time.
That is why it is very important for me to hear if it has helped you, even a simple “like” is enough to encourage the underwritten photographer/writer to continue with this work.
Thanks in advance for that !
Until next
Marc.
Main source of information about Rawtherapee: The RawPedia
Coming next : PictureFX (Fuji)film Simulation Workshop – Improving the Analog Film Look, and later : “mini scripts” + downloads.
For the best Fujifilm Recipes visit :
Discover more from Open Source Photography
Subscribe to get the latest posts sent to your email.

