

In this part I write about how I started making the new PictureFX Pro – Fujifilm Acros 100 II and the ultimate target : an Acros 100 II + R. It gives you an idea on how to start something like this, also a first insight into Presets and Curves,
As promised also a download of my “Holy Grail” of Preset and Curve of the new PictureFX Pro Acros II
In the third part of this workshop we will go even deeper into making a film simulation yourself, and I will write about the tools that may be useful or needed.
All is done in RawTherapee, current version 5.8
The first step – collecting data :
Back to the drawing table, that was the idea after the surprising outcome of the Fujifilm Acros 400 IR. The original idea was to develop an Acros II with RED filter.
For the development of all previous Fujifilm simulations I started from existing X-T1, X-T20 and X-T30 jpg’s. The problem with those pictures was that in the case of the X-T30 they did not come from camera but rather from a Lightroom simulation, and therefore unusable. For these new Fujifilm Acros Pro Series I started from scratch. Before you start making a film simulation you need to collect as much information about it as possible, if possible pictures made with the original film material, and/or as in the case with Fujifilm in camera simulations an “in camera conversion” or also called SOOC, further the necessary tools to create the simulation.
Fujifilm Acros is a Ortho-Panchromatic film type that Fujifilm developed to combine all the positive properties of these two types of film. But to what extent was their in camera film simulation the same as their real product ?
So first some research. I tried to find out why I couldn’t activate a red filter on my previous Acros version – after some Googling I found that I was not alone, but then it was about the 35mm real film version – why did a red filter work in the “in camera film simulation ? Has Fujifilm tuned its Acros film simulation to the original product ? Well, again after some more Googling I came to the conclusion that it wasn’t based on the original product. That opened up new possibilities, because if the digital Acros version was not Ortho/ Panchromatic and color mixer settings could be found on the internet, then I was already halfway through. Unfortunately there are none to find for Fujifilm – at least I didn’t find any. What I did find are articles about comparisons between Acros and other film types – and/or similarities. According to many, the best comparable products are Kodak TMax and Ilford FP4, there is even a rumor that Ilford is the manufacturer of Acros II.
So in summary: the Fujifilm “in camera” version of their own Acros was not Ortho/Panchro based, and I had found color mixer settings from other film types, I also knew which film types were comparable to Acros. Time to develop an improved version of my own Acros 100 II version from earlier, this would then be the new PictureFX Pro – Fujifilm Acros 100 II
Found on DPReview – Photoshop presets for various film stock looks – Besides the ones below I have found other tables scattered on the internet, most are about the same values. Ultimately, when you would dial in these values in the B&W Color Channel Mixer, you should obtain a film brand and type similar to the one mentioned next to it.
Agfa 200X: 18,41,41
Agfapan 25: 25,39,36
Agfapan 100: 21,40,39
Agfapan 400: 20,41,39
Ilford Delta 100: 21,42,37
Ilford Delta 400: 22,42,36
Ilford Delta 400 Pro: 31,36,33
Ilford FP4: 28,41,31
Ilford HP5: 23,37,40
Ilford Pan F: 33,36,31
Ilford SFX: 36,31,33
Ilford XP2 Super: 21,42,37
Kodak Tmax 100: 24,37,39
Kodak Tmax 400: 27,36,37
Kodak Tri-X: 25,35,40
Literature:
- Kyle Wurtz : Comparing Fuji’s Acros and Monochrome Film Simulations ,
- John Peltier : Fujifilm Film Simulations: More Than A Marketing Gimmick and Creating Fujifilm Custom Settings with Fujifilm X RAW,
- FujiXWeekly : Understanding Acros Film Simulation Options On Fujifilm X Cameras,
- DIY Photography : Acros II made by Ilford ?,
- The Darkroom : Ilford FP4 or Fuji Acros 100,
- ProPhoto Connection : Looking for a Fuji Acros Replacement?
If you want to get started with film simulation yourself, you will also need a matching film curve, which are rarer. Unfortunately, I never found one except the ones already included in a preset, but they are only made for that particular simulation. You can also find literature about this subject, but for me the logical step was to start from a curve that was already based on the embedded data in a Fujifilm jpg.
Step two – putting it all together :
I already had a self-developed film Curve for Acros (and Fujifilm in general) from my previous experiments, based on the auto matched curve embedded in the RAW, and I improved it even more. I based the color mixer settings on the comparisons found on the internet, namely Ilford FP4 : 28,41,31 and Kodak TMax 100 : 24,37,39. Starting with these two data and my improved Acros curve, I was able to tune the mixer settings to Raf and Jpg Acros test pictures from my own Fuji X-T20 camera.
One of the several steps that are followed to obtain the “best possible” simulation is the following:
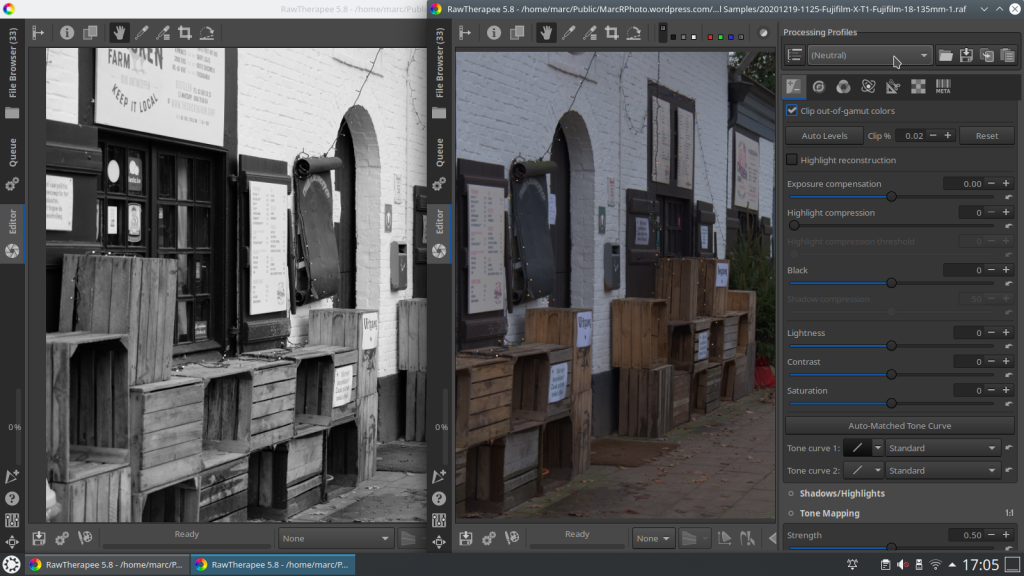
- open a scan of a photo or a SOOC jpg in the same software you use for the simulation
- open a RAW picture in the same software, and place it over each other so that you can adjust the RAW until it is identical to the underlying jpg
- save these settings and do this again on another photo
- if possible and also available of a color chart
The finally obtained settings then become your Simulation Preset of which you can also make a Lut afterwards

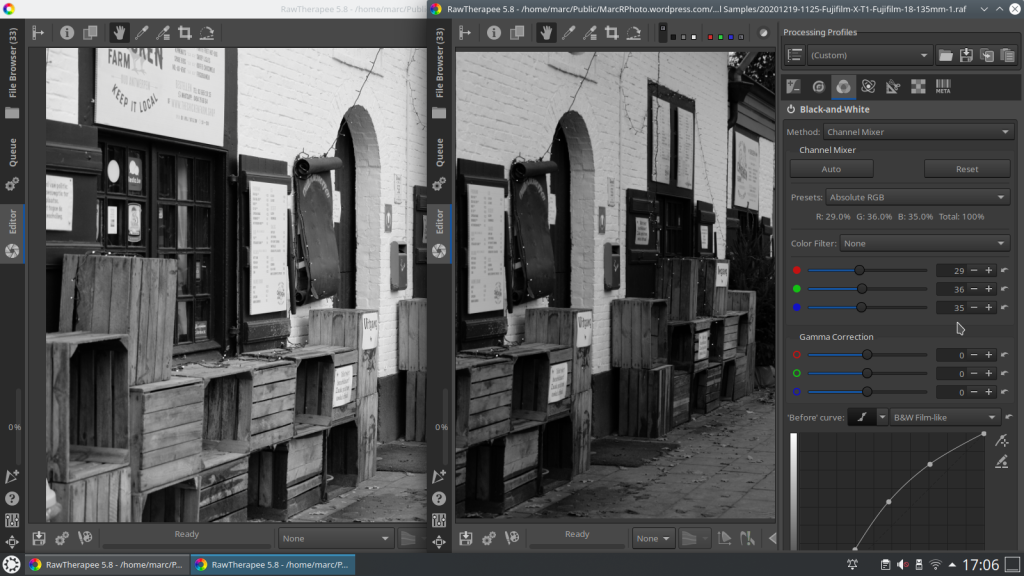
The mixer settings I used for my new PictureFX Pro Acros II version were finally: 29,36,35
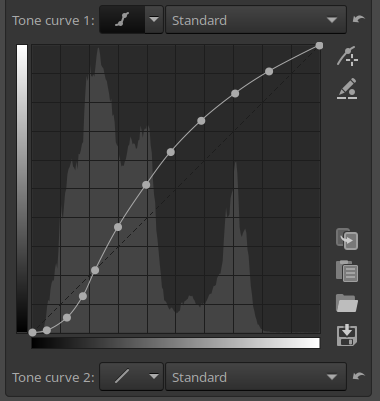
The Fujifilm curve settings:
CatmullRom
0 0
0.05 0.00753173
0.12 0.0518851
0.17551 0.126531
0.218 0.216944
0.297959 0.367347
0.396016 0.514345
0.481633 0.628571
0.588096 0.737598
0.706122 0.832653
0.824355 0.909633
1 1
With the B&W channel mixer settings and the used curve you now have a reasonably good film simulation, but you can go even further. By using an “after” curve you can fine-tune the high and low lights, causing different color variations, and thus adjusting the mixer settings again, etc …
You have to set a goal for yourself, because you can keep adjusting and never achieve perfection, it must remain fun!
The downloadable preset, curve and lut is the basis. Depending on your picture, subject, lighting, etc., you can then make a specific adjustment adapted for that picture.
And then we are also talking about sharpening, de-noise and any color/grayscale adjustments.
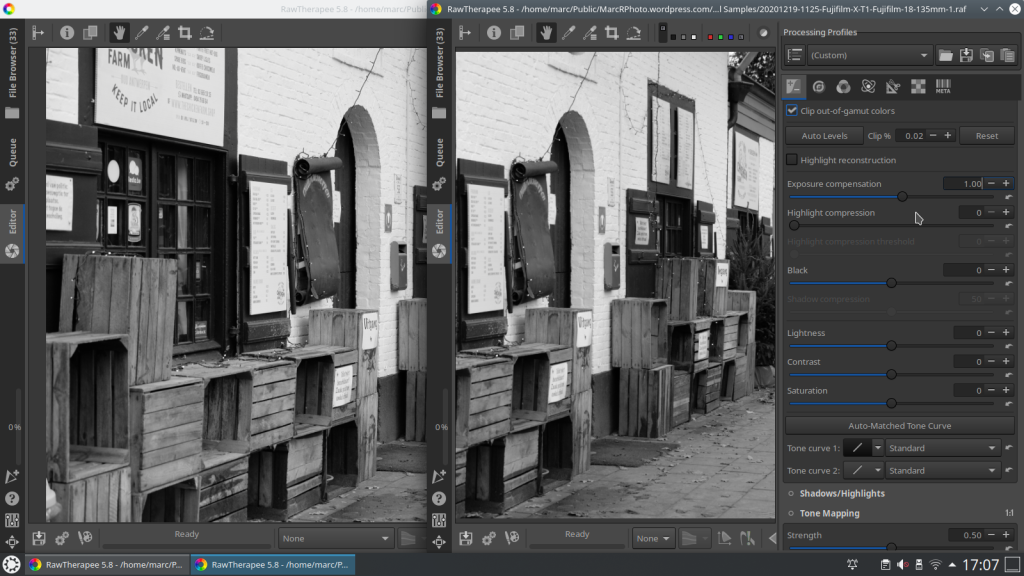
The data above formd the basis of my PictureFX Pro – Fujifilm Acros 100 II, on that basis I could apply any color filter, including a Red filter, more on this in the next session. Furthermore, some fine tuning in exposure on the target picture, and done!
Click on the logo below to download the new PictureFX Pro – Fujifilm Acros II, the Acros + R, Preset and Curve :

PictureFX© Logo Created with The Gimp 2.10
affosdom.com
Icons made by Freepik from www.flaticon.com
Discover more from Open Source Photography
Subscribe to get the latest posts sent to your email.

